Did your car radio suddenly go silent on your morning commute? Have your power windows decided to stop working on a hot day? Before you start dreading a hefty repair bill, take a deep breath. The culprit is often a tiny, inexpensive component: a blown car fuse.
Believe it or not, performing a car fuse replacement is one of the simplest and most empowering DIY tasks any car owner can learn. It requires no special mechanical skills, and the fix can take just a few minutes.
This comprehensive guide will walk you through everything you need to know to get your electronics working again. We’ll cover how to diagnose the problem, locate your fuse box, and safely install a new fuse like a pro.
What You’ll Learn:
- How to tell if you have a blown fuse
- Where to find your car’s fuse boxes
- A safe, step-by-step process for replacement
- Crucial safety tips to avoid causing more damage
- What is a Car Fuse and Why Do They Blow?
- Signs You Need a Car Fuse Replacement
- Tools and Materials You’ll Need
- Step-by-Step Guide to Car Fuse Replacement
- Step 1 – Safety First – Turn Off the Vehicle
- Step 2 – Locate the Fuse Box
- Step 3 – Identify the Problem Fuse Using the Diagram
- Step 4 – Remove the Blown Fuse
- Step 5 – Inspect the Fuse
- Step 6 – Install the Correct New Fuse
- Step 7 – Test the Component and Replace the Cover
- Troubleshooting – What If the New Fuse Blows Immediately?
- Conclusion
- Frequently Asked Questions (FAQ)
- What do the different colors on car fuses mean?
- Can I drive with a blown fuse?
- How much does a car fuse replacement cost?
- Are all car fuses the same?
What is a Car Fuse and Why Do They Blow?
Before we get our hands dirty, let’s quickly cover what a car fuse actually is. Think of it as a tiny, heroic bodyguard for your car’s more sensitive and expensive electrical components, like your stereo, engine computer, or lighting systems.
A fuse is essentially a special wire inside a plastic housing, designed to be the “weakest link” in an electrical circuit. If there’s a sudden power surge or a short circuit, the fuse sacrifices itself by melting and breaking the connection. This “blows” the fuse but saves the valuable component it was protecting from being fried.
Fuses can blow for a few common reasons:
- Simple old age: Like any part, they can wear out over time.
- A faulty component: A failing radio or motor might draw too much electrical current, causing the fuse to blow repeatedly.
- A short circuit: A damaged wire somewhere in the system could be causing a power surge.
Signs You Need a Car Fuse Replacement
A blown car fuse typically causes a very specific and sudden failure. If one of your car’s electrical gadgets stops working while everything else is fine, a fuse is the first thing you should check.
Look out for these common telltale signs:
- The radio, infotainment screen, or speakers are completely dead.
- Interior lights (dome lights, map lights, dashboard illumination) won’t turn on.
- Power accessories like windows, sunroof, power seats, or mirrors are unresponsive.
- The cigarette lighter or 12V power outlets have no power.
- Turn signals, brake lights, or headlights aren’t working (this can be a more serious issue, so check it immediately).
- The horn is silent.
If you’re experiencing one of these issues, there’s a very good chance that a simple fuse is to blame.
Tools and Materials You’ll Need
You don’t need a professional mechanic’s toolkit for this job. In fact, you probably have most of what you need already.
- Your Vehicle’s Owner’s Manual: This is your non-negotiable, most important tool. It’s the treasure map that will show you exactly where to find the fuse boxes and what each fuse does.
- A Pack of Assorted Automotive Fuses: You can buy a kit online or at any auto parts store for just a few dollars. Most modern cars use “blade” type fuses (like ATC, ATO, or Mini). A variety pack ensures you’ll have the right one.
- Fuse Puller Tool: This small plastic tool makes grabbing tiny fuses much easier. Your car might already have one clipped inside the fuse box cover. If not, needle-nose pliers will work carefully.
- A Flashlight or Headlamp: Fuse boxes are often tucked away in dark corners of your car, so good lighting is a must.
Step-by-Step Guide to Car Fuse Replacement
Here we go—the core of the operation. Follow these steps carefully for a safe and successful car fuse replacement.
Step 1 – Safety First – Turn Off the Vehicle
Before you touch anything related to the electrical system, make sure the car’s ignition is completely off. For good measure, take the key out of the ignition. This prevents any risk of an electrical short that could damage components or, more importantly, cause you harm.
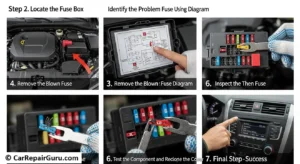
Step 2 – Locate the Fuse Box
Most vehicles have at least two fuse boxes. Your mission is to find the car fuse box location that houses the fuse for the malfunctioning component.
- The Interior Fuse Box: This panel is usually located inside the passenger compartment. Check under the dashboard on the driver’s side (often near the hood release lever), behind a small panel on the side of the dashboard (only visible when the driver’s door is open), or inside or below the glove compartment.
- The Engine Bay Fuse Box: This one is found under the hood, typically in a black plastic box near the battery. It usually has a lid that unclips and houses fuses for more critical engine components like the cooling fans, fuel pump, and headlights.
Don’t just guess! Your owner’s manual is your best friend here. It will have a dedicated section that shows you the precise location of each fuse box on your make and model.
Step 3 – Identify the Problem Fuse Using the Diagram
Once you’ve removed the fuse box cover, you’ll find your roadmap: the car fuse diagram. This is usually a sticker on the inside of the cover or a page in your owner’s manual.
This diagram is a map that labels each fuse slot with the name or an abbreviation of the component it protects (e.g., “RADIO,” “PWR WNDW,” “CIG,” “A/C”). Find the label for the part of your car that isn’t working. The number next to the label (like 10, 15, or 20) is the fuse’s amperage rating—a crucial piece of information for later.
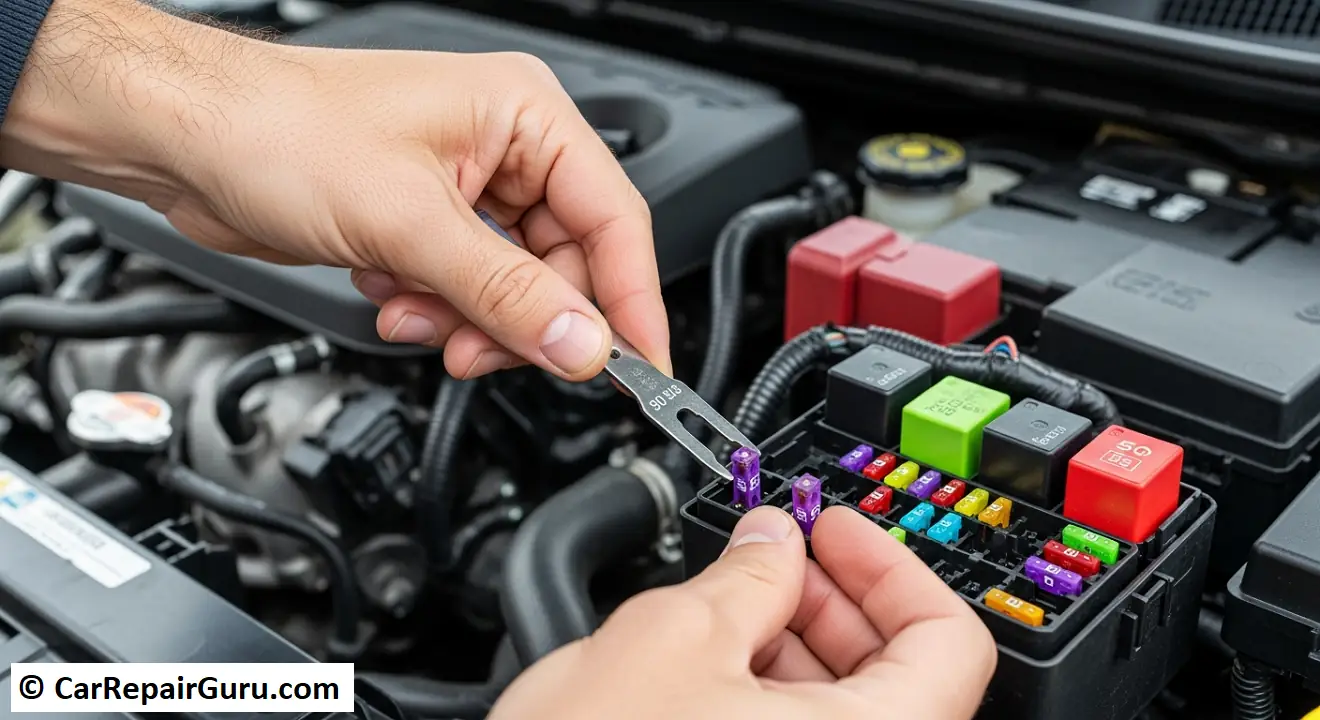
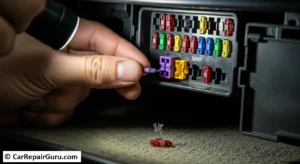
Step 4 – Remove the Blown Fuse
Now that you’ve identified the suspect, it’s time to pull it out. Use the plastic fuse puller tool to grip the top of the fuse and pull it straight out. If you don’t have a puller, you can gently use needle-nose pliers. Be careful not to squeeze too hard and crack the plastic. The fuse should pop out with a bit of firm pressure.
Step 5 – Inspect the Fuse
This is the moment of truth where you confirm your diagnosis. So, what does a blown fuse look like?
Hold the fuse up to the light and look at the thin metal wire or strip running between the two metal prongs inside the colored plastic.
- A Good Fuse: The metal wire will be solid and unbroken.
- A Blown Fuse: The metal wire will be visibly broken, snapped in the middle, or have a dark, smoky smudge inside the plastic housing from where it melted. The connection is clearly severed.
Step 6 – Install the Correct New Fuse
This is the most critical step of the entire process. You must replace the blown fuse with a new one that has the exact same amperage rating. The amperage is the number printed on top of the fuse (e.g., 10, 15, 20). Fuses are also color-coded by amperage to make this easier.
! ! ! CRITICAL WARNING ! ! !
Never, ever replace a blown fuse with one of a higher amperage rating. For example, don’t use a 20-amp fuse in a slot meant for a 10-amp. Doing so defeats the entire purpose of the fuse. It will allow too much current through, which can cause the wiring to overheat, permanently damage the component you were trying to fix, or even start an electrical fire.
Firmly push the correct new fuse into the empty slot until it is seated securely.
Step 7 – Test the Component and Replace the Cover
With the new fuse in place, put your key in the ignition and turn it to the “On” or “Accessory” position. Now, test the component that wasn’t working. Turn on the radio, try the power windows, or plug something into the 12V outlet. If it powers up, success!
Turn the car off again, put the fuse box cover back on securely, and you’re all done.
Troubleshooting – What If the New Fuse Blows Immediately?
You put in a new fuse, and the moment you turn the key, it blows again. What does that mean?
This is a clear sign that the fuse did its job perfectly. A new fuse blowing instantly indicates that there is a more serious underlying electrical issue, such as a short circuit in the wiring or a major fault within the component itself. The system is drawing far too much power, and the fuse is sacrificing itself to protect it. At this point, stop replacing fuses and consult a qualified mechanic to diagnose the root cause of the problem.
Conclusion
Congratulations! You’ve just mastered the art of car fuse replacement, one of the most fundamental and cost-saving DIY auto repairs. You’ve seen how a simple diagnosis and a few minutes of your time can fix frustrating electrical problems without a trip to the garage.
Just remember the golden rule: Always replace a fuse with one of the exact same amperage.
By tackling this small task, you’ve not only saved money but also gained a better understanding of how your vehicle works. Now, what car maintenance task will you tackle next?
Frequently Asked Questions (FAQ)
What do the different colors on car fuses mean?
The colors are a universal code for the fuse’s amperage (amp) rating. While you should always go by the number, the colors help with quick identification. Common colors include:
- Blue: 15 Amp
- Red: 10 Amp
- Yellow: 20 Amp
- Green: 30 Amp
- Orange: 40 Amp
Can I drive with a blown fuse?
It depends entirely on what the fuse is for. If it’s for a non-essential accessory like the radio or interior lights, it’s perfectly safe to drive until you can replace it. However, if the fuse is for a critical system like the fuel pump, headlights (at night), or brake lights, it could be unsafe or impossible to drive.
How much does a car fuse replacement cost?
This is one of the cheapest repairs you can possibly do! A whole kit containing dozens of assorted fuses can cost as little as $5 to $10. If you do it yourself, that’s your only cost. If you have a mechanic do it, they will likely charge a minimum labor or diagnostic fee, which could be $50 or more.
Are all car fuses the same?
No. While the blade-style fuse is the most common in modern cars, they come in different physical sizes (Standard/ATC, Mini, Micro). When checking car fuses, make sure the new fuse is not only the same amperage but also the same physical size and shape as the one you removed.