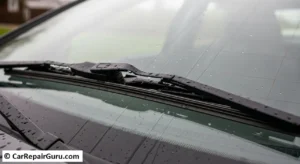
Screech. Squeak. Chatter. If that’s the soundtrack to your rainy-day drives, it’s a clear sign your car is trying to tell you something. Worn-out windshield wipers aren’t just an annoyance; they’re a genuine safety hazard, smearing water and obstructing your view when you need it most.
Many drivers put off this simple task, thinking it’s complicated or requires a trip to the mechanic. We’re here to tell you that’s not true. Changing your windshield wipers is one of the easiest, fastest, and most satisfying pieces of DIY car maintenance you can perform. It requires no special tools and takes less than 15 minutes.
This guide will walk you through every step of the windshield wiper replacement process, from identifying the signs of wear to choosing the right blades and installing them perfectly. Get ready to save some money and restore crystal-clear visibility to your drive.
- When to Change Your Windshield Wipers – 5 Telltale Signs
- Before You Begin – Getting the Right Wipers and Supplies
- Step 1 – Find Your Correct Wiper Blade Size
- Step 2 – Choose Your Wiper Blade Type
- Step 3 – Gather Your Supplies
- How to Change Your Windshield Wipers – The 5-Step Process
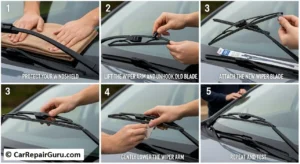
- Step 1 – Protect Your Windshield
- Step 2 – Lift the Wiper Arm and Unhook the Old Blade
- Step 3 – Attach the New Wiper Blade
- Step 4 – Gently Lower the Wiper Arm
- Step 5 – Repeat and Test
- Pro Tips – How to Make Your New Windshield Wipers Last Longer
- Troubleshooting Common Issues After Changing Wipers
- Problem – The New Wiper is Streaking or Skipping.
- Problem – The New Blade is Noisy (Chattering or Squeaking).
- Problem – The Wiper Arm Snapped Back onto the Windshield.
- Enjoy Clear Vision and a Safer Drive
- Frequently Asked Questions (FAQ)
- How often should you change windshield wipers?
- Can I just replace the rubber insert instead of the whole blade?
- What about the rear windshield wiper?
- How much does it cost to change windshield wipers?
When to Change Your Windshield Wipers – 5 Telltale Signs
Windshield wipers live a tough life. They battle everything from scorching sun and torrential rain to abrasive road grime and freezing ice. The rubber edge that does all the work is delicate and naturally degrades over time. While the general rule of thumb is to perform a wiper blade replacement every 6 to 12 months, your climate and usage are the real determining factors. Instead of relying on a calendar, let your wipers tell you when they’re done.
Here are the five unmistakable signs that it’s time to change your windshield wipers:
- Streaking or Smearing: This is the most common symptom. Instead of clearing water in a single, clean pass, the blade leaves behind lines, film, or wide streaks of moisture. This is caused by a hardened, cracked, or dirty rubber edge that no longer makes even contact with the glass.
- Skipping or Chattering: Do your wipers judder and bounce across the windshield instead of gliding smoothly? This “chattering” sound is incredibly distracting and happens when the blade’s rubber has hardened and lost its flexibility, preventing it from flipping properly on its return swipe.
- Squeaking and Screeching: While an occasional squeak on a semi-dry windshield is normal, constant and loud noises are a cry for help. It indicates the rubber is too hard or worn down to the point that the plastic or metal frame is making contact with the glass.
- Visible Damage to the Rubber: Take a moment to lift the wiper arm and inspect the blade. If you see any signs of splitting, tearing, or cracking along the rubber squeegee, its integrity is compromised. You might even notice chunks of rubber missing from the edge.
- Bent or Damaged Frame: The blade itself is attached to a frame (or is part of a unibody beam). If this frame is bent from a car wash or from fighting heavy ice, it won’t hold the rubber edge evenly against the windshield, causing massive gaps in coverage.
Before You Begin – Getting the Right Wipers and Supplies
A successful DIY project starts with the right preparation. Rushing to the auto parts store and grabbing the first box you see is a recipe for frustration. Taking five minutes to get the right parts and supplies will make the actual installation a breeze.
Step 1 – Find Your Correct Wiper Blade Size
Wiper blades are not universal. They come in different lengths (measured in inches), and most vehicles use a different size for the driver’s side and the passenger’s side. Finding the right size is crucial for proper coverage and to prevent the wipers from hitting each other.
Here are three foolproof ways to find your size:
- Check Your Owner’s Manual: This is the most reliable source. Look in the index under “Wiper Blades” or “Vehicle Maintenance” for the correct lengths.
- Use an In-Store or Online Parts Finder: Every auto parts store has a digital kiosk or a thick binder where you can look up your car’s year, make, and model to find the exact part numbers and sizes you need. Most online retailers have a similar tool.
- Measure the Old Blades: If all else fails, a simple tape measure works perfectly. Measure each blade from one end of the rubber to the other.
Step 2 – Choose Your Wiper Blade Type
When you find your size, you’ll notice a few different styles. Here’s a quick breakdown:
- Conventional Wipers: The classic, budget-friendly design. They use a metal-hinged frame to apply pressure at several points along the blade. They work well but can be less effective in snowy and icy conditions.
- Beam Wipers: A modern, premium option. These blades are one solid piece of rubber with an internal spring steel “beam” that provides infinite pressure points for a smooth, uniform wipe. They are excellent at resisting ice and snow buildup.
- Hybrid Wipers: The best of both worlds. They combine the aerodynamic performance and even pressure of a beam blade with the sturdy outer frame of a conventional blade, often with a sleek plastic shell.
Step 3 – Gather Your Supplies
You don’t need a full toolbox for this job. All you’ll need is:
- Your new windshield wipers (double-check the sizes!)
- A thick, soft towel or a piece of cardboard
- A pair of needle-nose pliers (optional, but helpful for stubborn clips)
How to Change Your Windshield Wipers – The 5-Step Process
With your new wipers in hand, you’re ready to go. This whole process for both blades should take you less time than a coffee break. Let’s get to it.
Step 1 – Protect Your Windshield
Safety First! This is the most important step. The metal wiper arm is attached to a powerful spring. If you’re fumbling with the blade and the arm slips, it can snap back against your windshield with enough force to cause a chip or a crack, turning a $40 job into a several-hundred-dollar repair.
Action: Gently lift the first wiper arm away from the glass. Once it’s in the upright position, carefully place your folded towel or cardboard on the windshield directly underneath it. Now, if the arm accidentally slips, it will hit the soft towel instead of your glass.
Step 2 – Lift the Wiper Arm and Unhook the Old Blade
With the arm lifted, examine where the wiper blade connects to the arm. The vast majority of vehicles use a simple J-hook connector (it looks like the letter ‘J’ at the end of the arm).
Action: Look for a small plastic tab or button on the connector. Press and hold this tab down with your thumb. While holding the tab, push the entire wiper blade down along the arm (away from the hook). It should slide free with a little bit of wiggling. Once it’s clear of the hook, you can remove it completely. If the tab is stubborn, you can use the needle-nose pliers to gently persuade it.
Step 3 – Attach the New Wiper Blade
Unpack your new wiper blade, making sure you have the correct size for the side you’re working on. Most new blades come with pre-installed adapters that work with J-hook arms.
Action: Orient the new blade the same way the old one came off. Thread the J-hook of the wiper arm through the opening in the blade’s connector. Pull the blade up into the hook until you hear a firm, satisfying CLICK. That click is your confirmation that the blade is securely locked in place. Give it a gentle tug to be absolutely sure it won’t fly off during the first rainstorm.
Step 4 – Gently Lower the Wiper Arm
Once the new blade is secure, you can remove the protective towel.
Action: Carefully and slowly guide the wiper arm back down until the new blade rests gently on the windshield. Do not let it snap back on its own.
Step 5 – Repeat and Test
You’re halfway there! Now, simply repeat steps 1 through 4 for the other side. Remember, the passenger side may be a different length.
Action: Once both blades are installed, get in the driver’s seat and test them out. Spray some windshield washer fluid and turn the wipers on. Watch them glide smoothly and silently across the glass, leaving a perfectly clear path. Congratulations, you just successfully completed your windshield wiper replacement!
Pro Tips – How to Make Your New Windshield Wipers Last Longer
You’ve just invested in clear vision; now let’s make it last. A few simple habits can dramatically extend the life and performance of your new wiper blades, ensuring they work perfectly from season to season.
Clean Your Blades Regularly: Your wipers collect a surprising amount of dirt, pollen, and road grime. Once or twice a month, dampen a paper towel with windshield washer fluid or a bit of rubbing alcohol and gently wipe down the rubber edge of each blade. You’ll be amazed at the black gunk that comes off, and your reward will be a streak-free wipe.
Keep Your Windshield Clean: A clean windshield is less abrasive. Regularly washing your car or even just cleaning the glass at the gas station removes the gritty particles that can wear down the delicate rubber edge of your wipers.
Never Run Wipers on a Dry Windshield: This is a major cause of premature wear and that awful chattering sound. The rubber blade is designed to glide on a layer of water. Always use your washer fluid to lubricate the glass before turning on the wipers.
Defeat Ice Manually: Never, ever use your wipers as an ice scraper. The force required can easily tear the rubber and can even damage the wiper motor itself. Always use a proper ice scraper to clear heavy frost and ice before using your wipers.
Lift Wipers in Winter: If you’re expecting a snowstorm or freezing rain, it’s a great practice to pull your wiper arms up and away from the windshield. This prevents them from freezing solidly to the glass, saving you from a frustrating morning and potential damage.
Troubleshooting Common Issues After Changing Wipers
You followed all the steps, but something isn’t quite right. Don’t worry! Most post-installation issues are minor and very easy to fix. Here’s how to troubleshoot the most common problems.
Problem – The New Wiper is Streaking or Skipping.
You just installed them, and they’re already performing poorly. It’s frustrating, but the fix is usually simple.
- Solution 1: Check for a Protective Cover. Many premium wiper blades ship with a thin, brightly colored plastic strip covering the rubber edge to protect it. It’s easy to miss in your excitement to install them. Make sure you’ve removed it.
- Solution 2: Clean Everything. Sometimes there’s a residue left over from the manufacturing process, or your windshield might have a film of wax or road grime. Give both the new rubber blade and your windshield a thorough cleaning with rubbing alcohol.
- Solution 3: Ensure a Secure Fit. A loose blade can’t apply even pressure. Gently wiggle the wiper blade at the connector. If it feels loose, unhook it and re-attach it, making sure you hear that definitive “click.”
Problem – The New Blade is Noisy (Chattering or Squeaking).
Brand new wipers should be nearly silent. If they’re making a racket, it’s often for one of two reasons.
Solution: The most likely cause is a lack of lubrication. Test them again with a generous spray of washer fluid. The noise may also be caused by an “unsettled” blade. Sometimes, a new blade needs a few swipes with fluid to properly seat itself and conform to the curve of your windshield.
Problem – The Wiper Arm Snapped Back onto the Windshield.
It happens. You looked away for a second, and thwack!
Solution: This is exactly why we use a towel! First, take a deep breath. Then, very carefully inspect the area of impact under a bright light. Look for any tiny chips or new star-shaped cracks. If you see any damage at all, even if it’s small, contact a professional auto glass repair service immediately. A small chip can quickly spread into a large crack, so getting it filled early is critical.
Enjoy Clear Vision and a Safer Drive
Congratulations! You’ve just mastered a fundamental piece of car care. By learning how to change your own windshield wipers, you’ve not only saved money but also taken direct control over your safety on the road. There’s a unique satisfaction in knowing you did the job right and can now face any weather with the confidence of a crystal-clear view.
No more smearing, no more screeching—just the quiet, smooth swipe of effective wipers. Now that you’ve seen how easy this is, what other DIY car maintenance projects will you tackle next?
Frequently Asked Questions (FAQ)
How often should you change windshield wipers?
The most accurate answer is: as soon as you notice a decline in performance. However, a good preventative maintenance schedule is to replace them every 6 to 12 months. If you live in a very sunny climate like Arizona (where the sun bakes the rubber) or a very icy one like Minnesota (where ice tears at it), you may find yourself on the 6-month end of that spectrum.
Can I just replace the rubber insert instead of the whole blade?
On some, typically older or original equipment (OEM) wiper blades, you can. This is called a “wiper refill.” It involves sliding the old rubber strip out of the blade’s metal frame and inserting a new one. While it can be slightly cheaper, it’s also more tedious, and it doesn’t address any wear and tear on the blade’s frame or hinge points. For most people, replacing the entire blade assembly is far easier and ensures the whole unit is in perfect working order.
What about the rear windshield wiper?
The process for a rear wiper is very similar but can sometimes use a different style of connector. The principles are the same: identify the size, lift the arm, find the release mechanism (it may be a different type of clip), and swap the old blade for the new one. The rear arm is often not a J-hook, so pay close attention to the new blade’s instructions and included adapters.
How much does it cost to change windshield wipers?
This is the best part of doing it yourself. Your only cost is the parts. A pair of new wiper blades can range from about $30 for a basic conventional set to $80 or more for a premium set of beam or hybrid blades. If you have them changed at a dealership or quick-lube shop, you can expect to pay an additional $20 to $40 in labor for what is, as you now know, a 10-minute job.