Let’s be honest, popping the hood of your car can feel intimidating. With a maze of tubes, wires, and mysterious components, it’s easy to feel like you need a special degree just to look around. But what if I told you that one of the most critical car maintenance tasks you can perform is also one of the easiest?
We’re talking about checking your engine oil.
This simple, 5-minute check is your first line of defense against expensive engine damage. It’s the health check-up for your car’s heart. Keeping your engine oil at the right level and in good condition ensures everything runs smoothly, protects your investment, and gives you priceless peace of mind on the road.
In this guide, we’re going to walk you through everything, step-by-step. Forget the jargon and confusion. We’ll cover what you need, how to do the check, how to read what you see, and what to do next. By the end, you’ll know exactly how to check your engine oil like a seasoned pro.
- What You’ll Need and When to Check
- Should You Check Engine Oil When It’s Hot or Cold?
- Why You Must Park on Level Ground
- How to Check Your Engine Oil in 5 Simple Steps
- Step 1: Locate and Pull Out the Dipstick
- Step 2: Wipe the Dipstick Clean
- Step 3: Re-insert the Dipstick Fully
- Step 4: Pull It Out Again and Read the Level
- Step 5: Analyze the Oil Level and Condition
- How to Read the Oil Dipstick and Assess Oil Health
- Reading the Oil Level
- Checking the Oil’s Color and Consistency
- 3 Common Mistakes to Avoid When Checking Your Oil
- Your Oil Level is Checked. Now What?
- If Your Oil Level is Low: How to Add Engine Oil
- What if I Overfilled the Engine Oil?
- If Your Oil is Dirty or Milky
- More Than a Lubricant: What Engine Oil Really Does for Your Car
- A 5-Minute Check for a Healthy Engine
- Frequently Asked Questions about Engine Oil
- How often should I check my engine oil?
- What are the symptoms of low engine oil?
- What type of engine oil does my car need?
- Is it OK to mix different brands of engine oil?
- Why is my car losing oil if there’s no leak on the ground?
What You’ll Need and When to Check
Before you even touch the hood latch, a little preparation goes a long way. Getting this part right is the secret to an accurate reading and a mess-free experience.
Tools & Supplies You’ll Need:
A clean, lint-free rag or paper towel: You’ll use this to wipe the dipstick. A shop rag or blue paper towel is perfect; try to avoid fluffy bath towels or cheap paper towels that can leave lint behind.
Gloves (optional): Engine oil can be messy, and used oil contains contaminants. A pair of disposable nitrile or latex gloves will keep your hands clean.
A funnel (optional but recommended): If you discover your oil is low, a funnel is your best friend. It prevents messy and wasteful spills when you’re adding engine oil.
The correct engine oil for your car: If you think you might need to top up, have the right oil on hand. We’ll cover how to find this in a bit.
Should You Check Engine Oil When It’s Hot or Cold?
This is the number one question people ask, and the answer is crucial. For the most accurate reading, you should check your engine oil when the engine is cool or warm, but not immediately after driving.
The ideal time is in the morning before you’ve started the car for the day. Alternatively, if you’ve been driving, turn the engine off and wait at least 10-15 minutes. This gives all the oil that’s been circulating through the engine time to drain back down into the oil pan at the bottom. If you check it right after shutting the engine off, the dipstick will show a lower-than-actual level, which might cause you to overfill it.
Why You Must Park on Level Ground
Imagine trying to measure the water in a tilted glass—you’d get a different reading depending on which side you looked at. Your car’s oil pan is the same. To get an accurate measurement of the engine oil level, your car must be parked on a flat, level surface. A sloped driveway or a tilted parking spot will cause the oil to pool to one side, giving you a false reading.
How to Check Your Engine Oil in 5 Simple Steps
Alright, you’ve got your rag and you’re on level ground. Let’s get to it. Follow these five steps for a perfect check every time.
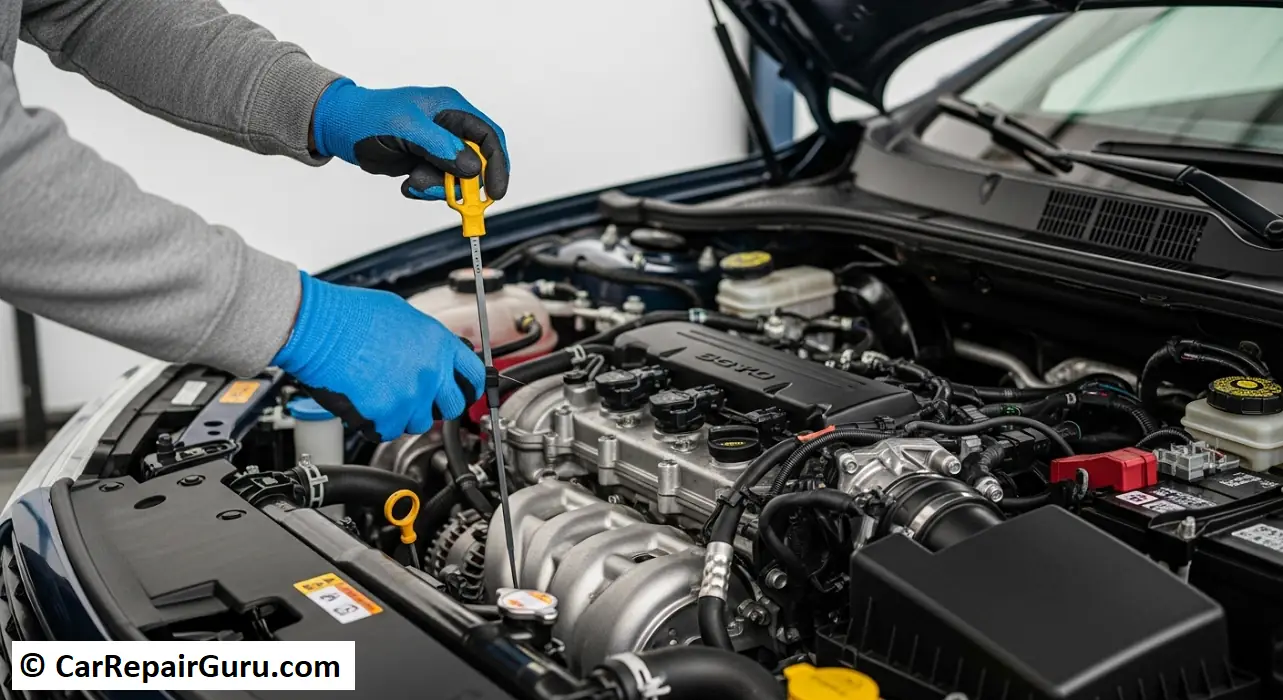
Step 1: Locate and Pull Out the Dipstick
First, open your car’s hood and secure it. Scan the engine bay. You’re looking for the oil dipstick. Automakers make this easy to find—it almost always has a brightly colored handle, usually a yellow or orange plastic loop or T-handle. It might even have a small oil can symbol on it. Once you’ve found it, grip the handle firmly and pull it all the way out.
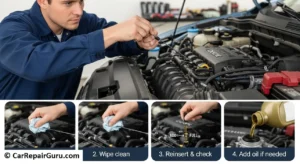
Step 2: Wipe the Dipstick Clean
The oil currently on the dipstick is from the engine running and sloshing around, so it won’t give you an accurate reading. Take your clean, lint-free rag and wipe the entire metal end of the dipstick completely clean, from the handle down to the tip.
Step 3: Re-insert the Dipstick Fully
This step is critical for accuracy. Take the now-clean dipstick and slide it all the way back into its tube. Make sure it goes in completely and is fully seated, just as it was before you pulled it out. Don’t just dip it in halfway—push it until the handle is flush with the top of the tube.
Step 4: Pull It Out Again and Read the Level
Now for the moment of truth. Smoothly pull the dipstick out a second time. This time, don’t wipe it. Hold it horizontally to prevent the oil from running up or down the stick, which would spoil the reading.
Step 5: Analyze the Oil Level and Condition
Look closely at the end of the dipstick. You will see a clear line where the oil stops. This line tells you your engine’s oil level. Now, let’s figure out what that line—and the oil itself—is telling you.
How to Read the Oil Dipstick and Assess Oil Health
Reading the dipstick is a two-part process: checking the level and checking the condition. Both are equally important for understanding your engine’s health.
Reading the Oil Level
The tip of your dipstick will have markings to indicate the proper operating range. These can look different depending on the car:
- Two small holes or dots.
- The letters ‘L’ (Low) and ‘F’ (Full).
- A cross-hatched or textured area.
No matter the marking, the principle is the same. The top mark/hole indicates ‘Full,’ and the bottom mark/hole indicates ‘Low’ or ‘Add.’ The ideal oil level is at or just below the ‘Full’ mark. The distance between the ‘Low’ and ‘Full’ marks typically represents about one quart of oil.
- If the level is in the safe range: You’re good to go!
- If the level is at or below the ‘Low’ mark: You need to add oil immediately.
Checking the Oil’s Color and Consistency
Don’t just look at the level. Look at the oil itself. Rub a little between your fingers (if you aren’t wearing gloves).
- Healthy Oil: Clean oil is a transparent, amber, or honey color. It should feel smooth.
- Dirty Engine Oil: If the oil is dark brown or black, it’s full of contaminants and likely due for an oil change. This is normal as oil does its job of cleaning the engine.
- Milky or Foamy Oil: If the oil on the dipstick looks milky, cloudy, or like a coffee with too much cream, this is a serious red flag. It typically means coolant is leaking into your oil, often from a failed head gasket. Do not start the engine. Call a mechanic immediately.
- Gritty or Contains Metal Flakes: If you feel tiny, gritty particles or see metallic specks shimmering in the oil, this is a sign of internal engine wear. This also requires a professional diagnosis from a mechanic.
3 Common Mistakes to Avoid When Checking Your Oil
Getting a correct reading is easy, but a few simple errors can throw off your results. Here are the most common mistakes people make and how to avoid them.
1. Not Inserting the Dipstick All the Way: After wiping the dipstick clean, many people only dip it partly back into the tube. This will always result in a false “low oil” reading. Always push the dipstick until it is fully seated to measure the true oil level in the pan.
2. Misreading the Dipstick: Sometimes, oil can smear up the side of the dipstick as you pull it out. Look for the solid, consistent line of oil across the stick. Ignore any thin, stray streaks that might be higher up. Holding it horizontally helps prevent this.
3. Checking on an Uneven Surface or a Hot Engine: As we covered, this is the foundation of an accurate check. Rushing the process by not waiting for the oil to settle or checking on a hill will lead to incorrect readings and could cause you to overfill or underfill your engine.
Your Oil Level is Checked. Now What?
So you’ve read the dipstick. Great! Here’s your action plan based on what you found.
If Your Oil Level is Low: How to Add Engine Oil
If your oil is at or below the ‘Add’ line, you need to top it up.
Confirm the Correct Oil: First, check your owner’s manual to find the specific type of engine oil your car requires. It will specify the viscosity (e.g., 5W-30) and type (e.g., synthetic, conventional). Using the wrong oil can harm your engine.
Locate the Oil Filler Cap: Find the cap on top of the engine. It usually has the same oil can symbol as the dipstick or the word “Engine Oil” printed on it.
Add Oil Slowly: Unscrew the cap and place your funnel in the opening. Add about half a quart of oil at a time.
Wait and Re-check: Wait a minute for the oil to drain down, then re-check the level with the dipstick using the same procedure as before.
Repeat as Needed: Continue adding small amounts and re-checking until the oil level reaches the ‘Full’ mark. Be careful not to overfill! Overfilling can be just as damaging as low oil.
What if I Overfilled the Engine Oil?
If you accidentally added too much oil and the level is well above the ‘Full’ mark, don’t start the car. Too much oil can get churned into a foam by the crankshaft, causing a loss of oil pressure and improper lubrication. The best course of action is to have the excess oil drained by a professional.
If Your Oil is Dirty or Milky
- If it’s just dark and dirty: Your oil is doing its job. Simply schedule a standard oil change soon.
- If it’s milky or has metal flakes: As mentioned, this is a sign of a serious problem. Contact your mechanic for an inspection.
More Than a Lubricant: What Engine Oil Really Does for Your Car
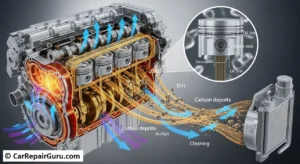
We talk a lot about oil levels, but have you ever wondered what does engine oil do besides just making things slippery? It has four crucial jobs that keep your engine alive.
- Lubrication: This is its main job. Oil creates a thin, protective film between moving metal parts—like pistons, bearings, and camshafts—to prevent them from grinding against each other and self-destructing from friction.
- Cooling: While your radiator does the heavy lifting, engine oil plays a huge role in engine cooling. It circulates through hot areas and carries heat away, preventing components from overheating and warping.
- Cleaning: Engine oil is like the bloodstream of your engine. It contains detergents that pick up dirt, carbon deposits, and sludge. It then carries these contaminants to the oil filter, where they are trapped, keeping the engine’s internal passages clean.
- Sealing & Corrosion Prevention: Oil helps form a seal between the pistons and cylinder walls, which is essential for compression and engine efficiency. It also contains additives that coat metal surfaces to prevent rust and corrosion from moisture and acids.
A 5-Minute Check for a Healthy Engine
You did it. You now have the knowledge and confidence to perform one of the most vital health checks for your vehicle. By taking just five minutes every month to check your oil on level ground when the engine is cool, you are taking a powerful, proactive step in car ownership.
This simple habit protects your engine, saves you from potential four-figure repair bills, and ensures your car is safe and reliable for the road ahead.
Was this guide helpful? Share it with a new driver or let us know in the comments below
Frequently Asked Questions about Engine Oil
How often should I check my engine oil?
A good rule of thumb is to check it at least once a month and always before a long road trip. If you have an older car that you know consumes a bit of oil, checking every other time you fill up with gas is a smart habit.
What are the symptoms of low engine oil?
Your car will often give you warning signs. Look out for an oil pressure warning light on your dashboard (it looks like a dripping oil can), ticking or knocking noises from the engine, a distinct burning oil smell, or an engine that is overheating. If you notice any of these, check your oil immediately.
What type of engine oil does my car need?
The definitive answer is always in your vehicle’s owner’s manual. It will list the required viscosity grade (like 0W-20 or 5W-30) and whether it needs conventional, synthetic blend, or full synthetic oil. The oil filler cap may also have the viscosity printed on it.
Is it OK to mix different brands of engine oil?
In an emergency, yes. It is far better to add a different brand of oil with the correct viscosity than it is to run the engine with low oil. However, for best performance, it’s recommended to stick to the same brand and type, as different manufacturers use unique additive packages.
Why is my car losing oil if there’s no leak on the ground?
This is a common issue, especially in older vehicles, and it’s called oil consumption. As an engine ages, seals and piston rings can wear out, allowing a very small amount of oil to enter the combustion chamber and be burned away with the fuel. If you’re consistently losing oil with no leak and have to add more than one quart between oil changes, it’s wise to have a mechanic investigate to ensure there isn’t a more serious issue.