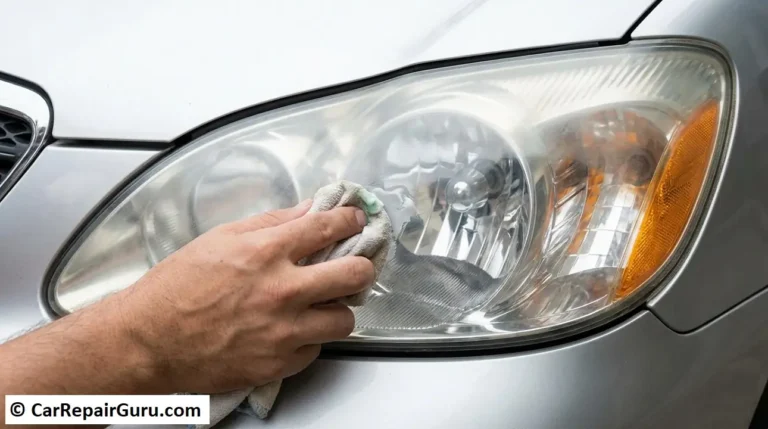
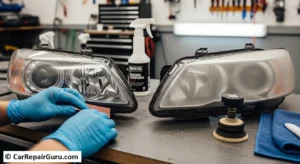
Take a look at your car. Do the headlights look cloudy, yellow, or hazy, like they have a bad case of cataracts? If so, you’re not just dealing with an eyesore. Those foggy headlights are a serious safety hazard, potentially cutting your light output and nighttime visibility by 50% or more.
The good news? You don’t have to live with it, and you certainly don’t need to shell out hundreds of dollars for brand-new headlight assemblies. Restoring your cloudy headlights to a crystal-clear, like-new condition is one of the most satisfying and impactful DIY projects you can do for your car.
This guide will walk you through everything you need to know. We’ll cover why your headlights get foggy in the first place, three proven methods for cleaning them (from a quick fix to a professional-grade restoration), and the single most important step for making sure they stay clear for years to come.
- Why Do Headlights Get Foggy and Yellow in the First Place?
- Before You Start – Essential Preparation and Supplies
- How to Clean Foggy Headlights – 3 Methods from Easiest to Best
- Method 1 – The Quick Fix (The Toothpaste or Baking Soda Method)
- Method 2 – The Enthusiast Method (Wet Sanding & Polishing)
- Method 3 – The Best & Easiest Method (Using a Headlight Restoration Kit)
- A Closer Look at the Tools – What You Really Need for a Pro Finish
- Understanding Sandpaper Grits
- Choosing the Right Polishing Compound
- The Power of a Drill (and When You Need It)
- When to Restore vs. When to Replace Your Headlights
- Green Light – You Should Definitely Restore If…
- Red Light – Consider Replacement If…
- The Cost-Benefit Analysis
- How to Protect Your Headlights and Keep Them Clear
- Final Thoughts – Enjoy Brighter, Safer Night Driving
- Frequently Asked Questions (FAQ)
- Does cleaning headlights with bug spray and DEET actually work?
- How long does headlight restoration last?
- Can you clean headlights that are foggy on the inside?
- How much does it cost to have headlights professionally restored?
Why Do Headlights Get Foggy and Yellow in the First Place?
Ever wonder why this happens? It’s not just dirt. The problem is baked right into the material of modern headlights.
Unlike the glass headlights of vintage cars, today’s headlights are made from a durable plastic called polycarbonate. This material is lightweight and shatter-resistant, but it has one major weakness: the sun. To protect it, manufacturers apply a UV-protective clear coat at the factory.
Over time, this protective layer is broken down by a constant barrage of:
- UV Radiation: The sun’s rays are the number one enemy. They cause the clear coat to fail and the polycarbonate itself to oxidize, which results in that ugly yellow tint and cloudy appearance. Think of it as a sunburn for your headlights.
- Road Debris: Sand, gravel, and road salt act like sandpaper, creating microscopic pits and scratches that dull the surface.
- Harsh Chemicals & Acid Rain: Chemicals from the road and pollutants in the rain can slowly eat away at the protective coating, accelerating the yellowing process.
Essentially, when you’re cleaning foggy headlights, you’re not just wiping away grime; you’re removing that dead, damaged, and oxidized outer layer of plastic to reveal the fresh, clear material underneath.
Before You Start – Essential Preparation and Supplies
Don’t just grab a rag and start scrubbing! Proper prep takes five extra minutes but makes all the difference between a great result and a potential mess. It’s the secret that separates the pros from the amateurs.
- Step 1: Gather Your Supplies. At a minimum, you’ll need a bucket with car soap and water, a few clean microfiber towels, and a roll of automotive painter’s tape.
- Step 2: Give Them a Good Wash. Your headlights need to be perfectly clean before you begin. Wash them thoroughly with soap and water to remove any loose dirt, bug guts, and road grime. Dry them completely with a microfiber towel.
- Step 3: Mask Off the Surrounding Paint. This is a non-negotiable step. Every method we’ll cover involves some level of abrasion. If you let sandpaper or polishing compounds slip onto your car’s paint, you can easily scratch and damage the finish. Carefully apply painter’s tape around the entire perimeter of the headlight, protecting every painted surface it touches.
With your headlights clean and your paint protected, you’re ready to choose your method.
How to Clean Foggy Headlights – 3 Methods from Easiest to Best
We’ll cover three different approaches to headlight restoration, ranging from a temporary fix using household items to a more permanent solution using a dedicated kit.
Method 1 – The Quick Fix (The Toothpaste or Baking Soda Method)
If your headlights have only mild haziness or you need a quick improvement for a night or two, this DIY headlight cleaning method can work in a pinch.
- Best for: Very light oxidation or a temporary solution.
- What You’ll Need: A tube of white toothpaste (the gritty paste kind, not the gel) or a paste made from baking soda and a small amount of water. You’ll also need a clean cloth or an old toothbrush.
- Step-by-Step Instructions:
- Apply a generous amount of toothpaste directly onto the foggy headlight lens.
- Using your cloth or toothbrush, begin scrubbing the lens in firm, small circular motions. You’re using the mild abrasives in the toothpaste to polish the plastic. Spend a few minutes on each light, applying consistent pressure.
- Rinse the headlight thoroughly with clean water, ensuring all toothpaste residue is washed away.
- Dry the lens with a microfiber towel and step back to assess your work. It should look noticeably clearer.
The Important Caveat: While the toothpaste method can provide a surprising improvement, it is not a permanent fix. All you’ve done is polish the oxidized surface. You haven’t added any new UV protection, so the fogginess will inevitably return, often in just a few weeks or months.
Method 2 – The Enthusiast Method (Wet Sanding & Polishing)
For moderate to heavy oxidation, you need to bring out the bigger guns. Wet sanding is the most effective way to manually remove the damaged layer of plastic and achieve a truly crystal-clear finish.
- Best for: Someone comfortable with a more hands-on approach who wants near-perfect, professional-looking results.
- What You’ll Need: A spray bottle with water, several sheets of wet/dry sandpaper in various grits (a pack of 1000, 2000, and 3000-grit is a great start), and a quality plastic polishing compound (like Meguiar’s PlastX or Novus).
- Step-by-Step Instructions:
- Start with the Coarsest Grit: Spray both the headlight and your 1000-grit sandpaper with water. Keeping the surface wet is crucial. Sand the entire headlight in one direction (e.g., horizontally, side-to-side). The water runoff will likely turn a milky, yellowish color—that’s the oxidized plastic you’re removing!
- Move to the Next Grit: Wipe the headlight clean. Now, switch to your 2000-grit sandpaper. Wet the surface again and sand in the opposite direction (e.g., vertically, up-and-down). This cross-hatching pattern ensures you evenly remove the scratches from the previous step.
- Finish with the Finest Grit: Wipe clean once more. Use your 3000-grit sandpaper, again keeping the surface wet, and sand in the original direction (horizontally). When you’re done, the headlight should have a smooth, uniform, and frosted appearance. Don’t panic—this is exactly what you want!
- Polish to Perfection: Apply a small amount of plastic polish to a microfiber applicator pad or towel. Buff the headlight with firm pressure in circular motions. As you work, the frosted haze will disappear, revealing a stunningly clear, transparent lens. Wipe away any excess polish.
Method 3 – The Best & Easiest Method (Using a Headlight Restoration Kit)
This is our top recommendation for almost everyone. A good headlight restoration kit combines the effectiveness of the wet-sanding method with the convenience of having everything you need in one box, including the most critical final step.
- Best for: Anyone who wants guaranteed, long-lasting results without the guesswork.
- Why it’s the best choice: These kits, from reputable brands like 3M, Sylvania, or Cerakote, are engineered for this specific task. They include the correct sandpaper grits, a specially formulated polishing compound, and—most importantly—a UV protective sealant to finish the job.
- How They Work: While instructions vary slightly, they generally follow the same process as our enthusiast method:
- Sanding: You’ll use a series of included abrasive discs or pads (often designed to be used with a standard drill for speed and ease) to remove the oxidation.
- Polishing: You’ll apply a polishing compound to remove the sanding marks and restore clarity.
- Sealing: You’ll apply the final UV protective wipe or coating. This is the step that prevents the yellowing from coming back quickly.
For the price of about $20-$30, a quality kit delivers professional-level results that are far superior and longer-lasting than any temporary DIY hack.
A Closer Look at the Tools – What You Really Need for a Pro Finish
Walking down the automotive aisle can be overwhelming. Sandpaper, polishes, compounds—what’s the difference? Understanding the tools of the trade will not only give you more confidence but also lead to a much better result.
Understanding Sandpaper Grits
Sandpaper is the key to removing the damaged plastic layer, and “grit” simply refers to how coarse or fine it is. The number system is simple: the lower the number, the more aggressive the cut.
- Heavy-Duty Grits (800-1000): You’ll only need to start this low for severely neglected, yellow, and pitted headlights. This grit removes a lot of material quickly.
- Medium Grits (1500-2000): This is the workhorse stage. It removes the deeper scratches left by the lower grits and begins to smooth the surface. Many restoration kits start in this range.
- Fine/Finishing Grits (2500-3000+): This is the final and most important sanding step. It refines the surface to a smooth, frosted finish that is easy to polish back to perfect clarity. Never skip this step.
Always use wet/dry sandpaper and keep the surface lubricated with water to prevent clogging and deep scratches.
Choosing the Right Polishing Compound
Not all polishes are created equal. You need a compound specifically designed for plastics or a very fine-finish automotive polish. If you accidentally scuff the paint during this process, you can check my guide on removing car paint scratches to fix it up.
- Plastic Polishes (e.g., Meguiar’s PlastX, Novus): These are the best choice. They contain diminishing abrasives that break down as you work, gently removing the fine sanding marks without scratching the delicate polycarbonate.
- Paint Polishing Compounds: A fine-cut paint polish can also work, but avoid heavy-cutting or rubbing compounds meant for paint, as they can be too aggressive and haze the plastic.
The Power of a Drill (and When You Need It)
Can you do this all by hand? Absolutely. Will a standard power drill make the job faster and give you a more even, professional result? A thousand times yes. Many headlight restoration kits come with a hook-and-loop backing plate that attaches to your drill.
This allows you to use foam pads for polishing and sanding discs for stripping oxidation, ensuring consistent speed and pressure that your arm simply can’t replicate. It’s not mandatory, but it’s a game-changer.
When to Restore vs. When to Replace Your Headlights
While restoration works wonders on 90% of foggy headlights, there are times when a lens is simply beyond saving. Knowing the difference can save you time, money, and frustration.
Green Light – You Should Definitely Restore If…
- The damage is purely on the outer surface. This includes the classic yellowing, cloudiness, haziness, and light surface-level scratches.
- The headlight lens is structurally intact, with no deep cracks running through the plastic.
- There is no moisture or condensation trapped inside the lens. This is the ideal scenario for a DIY restoration.
Red Light – Consider Replacement If…
- You Have Deep Internal Cracks or “Crazing.” Look closely at the lens. If you see a network of tiny, spiderweb-like cracks that seem to be inside the plastic, no amount of sanding will remove them. This is called crazing and means the plastic itself has failed.
- There’s Chronic Moisture Inside the Lens. As mentioned, this indicates a broken factory seal. While some experts can bake open and reseal a headlight, for most people, it’s a sign that the housing is compromised and needs replacement to prevent electrical issues with the bulbs.
- The Lens is Severely Pitted. If the headlight looks like it’s been sandblasted by years of highway driving, with deep pits you can feel with your fingernail, you may not be able to sand deep enough to remove them without making the plastic too thin.
- The Mounting Tabs are Broken. If the headlight housing is physically broken from a minor accident, it won’t sit securely and can’t be aimed properly, making it unsafe. In this case, replacement is the only option.
The Cost-Benefit Analysis
A top-tier restoration kit costs around $25. A single new headlight assembly can cost anywhere from $200 for a standard sedan to well over $1,000 for a luxury or modern LED-equipped vehicle. The math is clear: always attempt a restoration first unless your headlight meets one of the “Red Light” conditions above.
How to Protect Your Headlights and Keep Them Clear
Congratulations! Your headlights are crystal clear. But if you stop now, all your hard work could be undone in six months.
After sanding and polishing, the plastic lens is raw and completely exposed. You’ve removed the failed factory coating, but now there’s nothing to protect it from the sun. Applying a new layer of UV protection is essential for permanent headlight restoration.
Here are your best options:
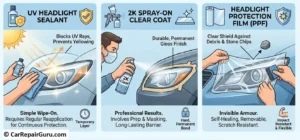
- UV Headlight Sealant: This is the easiest and most common solution, included in all good restoration kits. It’s typically a liquid applied with a special wipe. It cures to a hard, clear, UV-resistant layer that can last for 1-3 years.
- 2K Spray-on Clear Coat: For the ultimate in durability, you can use a professional-grade, two-part (2K) automotive clear coat from a spray can. This requires more careful masking and application but creates a finish as tough as your car’s paint.
- Headlight Protection Film (PPF): This is the premium option. A professional can apply a clear, self-healing film over your newly restored headlights. It acts as a physical barrier, offering the best possible protection against both UV rays and rock chips.
Final Thoughts – Enjoy Brighter, Safer Night Driving
Cleaning your foggy headlights is more than just a cosmetic upgrade; it’s a crucial safety restoration. By removing that hazy, yellowed layer of oxidized plastic, you’re restoring your vehicle’s ability to light up the road ahead, keeping you and your passengers safer. If you notice your lights are still dim after restoration, you should perform a comprehensive car light check to ensure your bulbs and fuses are in top shape.
Whether you opt for a quick polish or a full restoration kit, the difference will be—quite literally—night and day.
Which method are you going to try? Share your results or ask any questions in the comments below
Frequently Asked Questions (FAQ)
Does cleaning headlights with bug spray and DEET actually work?
Please, do not do this. This is a widely circulated myth that causes permanent damage. The DEET in bug spray is a powerful solvent that literally melts the surface of the polycarbonate plastic. It creates a temporarily clear, wet look, but it weakens the plastic, makes it sticky, and will cause it to yellow and fail much faster.
How long does headlight restoration last?
It all comes down to the UV protection. The toothpaste method might last a few weeks. A full restoration using a quality kit with a UV sealant will typically last 1 to 3 years, depending on your climate and how much sun exposure the car gets.
Can you clean headlights that are foggy on the inside?
These methods are only for external oxidation. If you see condensation or a foggy film on the inside of the lens, it means the factory seal on the headlight housing has failed, allowing moisture to get in. Unfortunately, sanding and polishing won’t fix this. The headlight assembly will likely need to be removed, opened, and resealed, or replaced entirely.
How much does it cost to have headlights professionally restored?
A professional detailer will typically charge between $75 and $150 to restore a pair of headlights. While they do a great job, you can achieve nearly identical results for a fraction of the price with a good DIY kit and about an hour of your time.