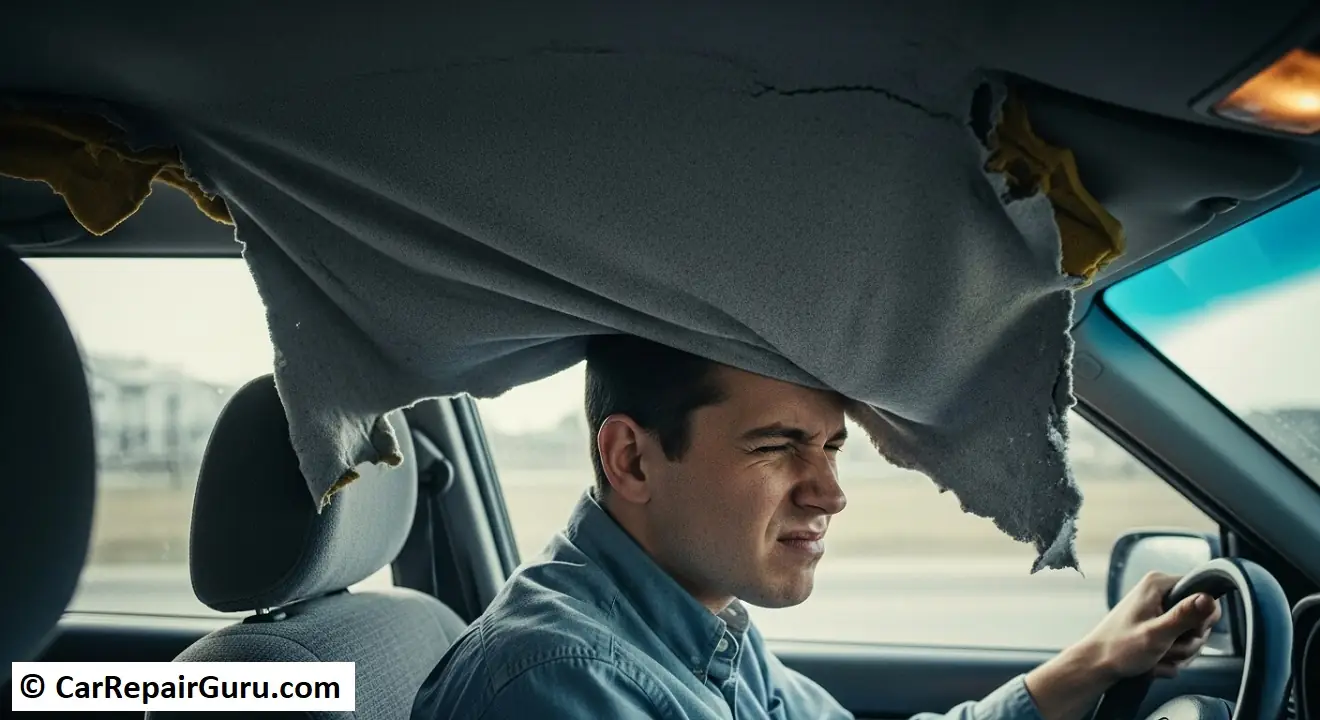
There are few things more annoying than getting into your car and having the roof fabric brushing against your head. A sagging car headliner isn’t just an eyesore; it’s a distracting nuisance that can even obstruct your view out of the rearview mirror. It makes a well-maintained car feel old and neglected.
The good news? You absolutely don’t have to live with it.
This guide will provide you with a solution for every budget and skill level. Whether you need a 5-minute fix to get you through the week or you’re ready to tackle a permanent, professional-looking DIY replacement, we’ve got you covered. We’ll explore why it happens, how to assess the problem, three different repair methods, and even tell you what it costs to have a pro handle it.
- Why Is My Car Headliner Sagging in the First Place?
- First, Assess the Damage – Quick Fix or Full Replacement?
- Method 1 – The Quick & Easy Fixes (No Removal Required)
- The Headliner Pin Fix
- The Glue Syringe Method
- Method 2 – The Permanent DIY Fix (Full Headliner Replacement)
- Tools and Materials You’ll Need
- Step-by-Step Guide to Replacing Your Headliner
- When to Call a Professional – Cost and Expectations
- Pro Tips & Common Mistakes to Avoid
- Final Thoughts – Enjoy Your Restored Car Interior
- Frequently Asked Questions (FAQ)
- Can you fix a sagging headliner with a steam cleaner?
- How long does it take to replace a car headliner?
- What is the best adhesive for a car headliner?
- Can I just re-glue the old fabric back on?
Why Is My Car Headliner Sagging in the First Place?
You might think the glue simply failed, but there’s a bit more to it. Your car’s headliner isn’t just a piece of fabric glued to a metal roof. It’s a sandwich of three layers:
- A rigid, molded backing board (the “headliner board”).
- A thin layer of polyurethane foam.
- The decorative fabric you see on the inside.
The real culprit behind a sagging headliner is the foam layer. Over time, this foam deteriorates, breaking down into a dusty, crumbly powder. Once the foam disintegrates, the adhesive has nothing to hold onto, and the fabric separates from the board. Gravity does the rest.
Common causes for this foam breakdown include:
- Age and Heat: This is the number one reason. Years of baking in the sun take a toll on the foam and adhesive (see our guide on protecting your car interior from summer heat), causing them to become brittle and fail.
- Humidity and Moisture: If you have a leaky sunroof, a bad window seal, or live in a very humid climate, moisture can get trapped and dramatically accelerate the foam’s decay.
- Cigarette Smoke: The chemicals in cigarette smoke can permeate the fabric and degrade the foam and glue over time.
- Poor Quality Original Materials: Sometimes, the adhesive or foam used by the manufacturer simply wasn’t designed to last a decade or more.
First, Assess the Damage – Quick Fix or Full Replacement?
Before you buy any supplies, take a moment to figure out which repair method is right for you. The level of damage will determine your course of action.
- Choose a quick fix if: You have small bubbles, a slightly detached edge near a window, or you just need a cheap, temporary solution.
- Choose a full replacement if: Large sections (or the entire roof) are drooping, or the problem keeps getting worse.
The Ultimate Test: Gently pinch the sagging fabric. Do you feel a powdery, orange-ish dust between your fingers? That’s the disintegrated foam. If you feel that crumbling residue, a quick fix with glue will not work. A full replacement is the only permanent solution.
Method 1 – The Quick & Easy Fixes (No Removal Required)
If you’re not ready for a full-scale project, these temporary solutions can get your headliner out of your face in minutes.
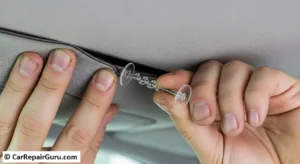
The Headliner Pin Fix
This is the fastest, cheapest, and easiest temporary sagging headliner repair, hands down. It’s the perfect “band-aid” to restore visibility and stop the annoyance.
- Best for: A fast, cheap, and effective temporary hold across large or small areas.
- What you’ll need: A pack of headliner saggy stoppers or twist pins. These often have a clear, corkscrew-like design that holds securely and is less noticeable than a standard thumbtack.
- How-to Steps:
- Gently push the sagging fabric back up towards the headliner board.
- Take a twist pin and push its point through the fabric and into the board behind it.
- Twist the pin clockwise until its clear head is snug against the fabric.
- Repeat this process, spacing the pins every 6-8 inches. For a cleaner look, arrange them in a neat diamond or straight-line pattern.
- Pros: Incredibly easy, very cheap, and completely reversible.
- Cons: It’s a temporary fix, and the pins will always be visible.
The Glue Syringe Method
For small, contained bubbles or sagging corners where the foam is still mostly intact, an adhesive injection can be a more discreet fix.
- Best for: Small bubbles or lifting edges where the underlying foam hasn’t turned to dust.
- What you’ll need: A headliner repair kit that includes a syringe and a bottle of specialized headliner adhesive. Do not use super glue or craft glue, as they can stain the fabric and won’t hold up to heat.
- How-to Steps:
- Fill the syringe with a small amount of the headliner adhesive.
- Carefully insert the needle into the center of the bubble or along the detached edge.
- Inject a small, thin bead of glue. Be careful not to use too much, as it can soak through and stain the fabric.
- Withdraw the syringe and gently press the fabric against the board, using your fingers to smooth the glue into a thin layer underneath.
- Hold it in place for a minute or two, or use a small roller to ensure a good bond.
- Pros: Can be nearly invisible for minor repairs.
- Cons: Only works if the foam is still good. It’s very easy to use too much glue and create a permanent, visible stain.
Method 2 – The Permanent DIY Fix (Full Headliner Replacement)
If you’re tired of temporary fixes and want a result that looks brand new, a full DIY headliner replacement is the way to go. It’s a detailed project, but it’s incredibly rewarding and will save you hundreds of dollars compared to a professional upholstery shop.
Tools and Materials You’ll Need
Gathering everything beforehand makes the process much smoother.
- New Headliner Fabric: Make sure you buy foam-backed headliner fabric. It’s sold specifically for this purpose. Measure your old headliner (length and width) and add at least 6 inches to each dimension.
- High-Temperature Headliner Spray Adhesive: This is non-negotiable. Regular spray adhesive will fail on the first hot day. Get 2-3 cans of a quality brand like 3M or Permatex.
- Stiff Bristle Brush or Wire Brush: For scrubbing off the old, dead foam.
- Plastic Trim/Panel Removal Tools: These are essential car repair tools that prevent you from scratching or breaking plastic interior pieces.
- Basic Hand Tools: A set of Phillips and flathead screwdrivers, and possibly a small socket set.
- Safety Gear: Gloves, safety glasses, and a dust mask are essential for the cleaning stage.
- Rubbing Alcohol or Panel Wipe: For final prep of the headliner board.
- A Helper (Recommended): An extra set of hands makes removing and reinstalling the large headliner board much easier.
Step-by-Step Guide to Replacing Your Headliner
Set aside 4-6 hours for this project. Don’t rush it!
Step 1: Carefully Remove the Headliner Board
The headliner board is held in by all the trim pieces attached to it. You must remove them in a logical order.
- Disconnect the battery as a precaution (a key step in proper car battery maintenance safety), since you’ll be unplugging lights.
- Remove sun visors, grab handles, and the center dome/map light consoles. They are typically held in by a few screws. Carefully disconnect any wiring harnesses.
- Pry off the plastic pillar trim. Start with the A-pillars (by the windshield), then the B-pillars (by the seatbelts), and finally the C-pillars (by the rear window). Use your plastic trim tools to gently pop the clips loose.
- Pro-Tip: Take pictures with your phone at each step and put screws for each component in a labeled bag. This will be a lifesaver during reassembly.
- Once all trim is removed, the headliner board should be free. Gently maneuver it out of the car, usually through a rear passenger door or the trunk hatch on an SUV.
Step 2: Strip the Old Fabric and Foam
This is the messiest, but most critical, part of the job.
- Lay the headliner board on a workbench or a large tarp.
- Peel off the old fabric. It should come off easily.
- Now, use your stiff brush or wire brush to scrub off every last bit of the old, decayed foam. It will turn into a sticky, orange dust. You must get the board down to its clean, raw fiberglass or cardboard surface. If you don’t, the new adhesive will fail. While you have everything apart, this is also a good time to check your car electrical wiring running along the roof for any wear.
Step 3: Prepare the Board for New Fabric
Once all the old gunk is gone, use a vacuum to remove any loose dust. Then, wipe the entire surface of the board with a rag dampened with rubbing alcohol. This removes any oils and ensures a perfect surface for the new adhesive.
Step 4: Apply the Adhesive
Work in a well-ventilated area for this step.
- Lay your new foam-backed fabric out, foam-side up.
- Following the directions on the can, spray an even, consistent coat of the high-temp adhesive onto the first half of the headliner board.
- At the same time, spray a matching coat onto the first half of the foam side of your new fabric.
- Wait for the adhesive to become tacky. This is key. The instructions will usually say to wait 3-5 minutes. It should feel sticky like masking tape, not wet.
Step 5: Lay the New Headliner Fabric
Patience is your friend here.
- Carefully take the glued section of the fabric and lay it onto the glued section of the board.
- Start from the center and work your way out. Use the palm of your clean hand to gently smooth the fabric onto the board, pressing it into all the curves and contours.
- Do not pull or stretch the fabric, as this will create wrinkles and thin spots. Just let it lay naturally and smooth it down.
- Once the first half is done, fold back the unglued portion of the fabric and repeat the gluing process for the second half.
Step 6: Trim and Reinstall
Let the adhesive cure for at least an hour.
- Flip the board over. Use a sharp razor blade or craft knife to trim the excess fabric from the edges.
- Feel for the holes for your visors, lights, and handles, and carefully cut them out from the fabric side.
- With a helper, carefully maneuver the newly-covered board back into the car.
- Reinstall all the trim, lights, and handles in the reverse order you removed them. Reconnect the battery, and you’re done!
When to Call a Professional – Cost and Expectations
Maybe a full DIY project isn’t for you, and that’s okay. A professional auto upholstery shop will perform the exact same replacement process, guaranteeing a perfect result.
- Average Cost to Fix a Sagging Headliner: You can expect to pay anywhere from $250 to $600.
- Factors Affecting Cost:
- Vehicle Size: A small sedan is cheaper than a large SUV with more surface area.
- Sunroof: Vehicles with sunroofs are more complex and will be on the higher end of the price range.
- Complexity: Some cars have more intricate trim and electronics, increasing labor time.
- Local Labor Rates: Prices vary significantly by location.
Pro Tips & Common Mistakes to Avoid
Avoid these common pitfalls to ensure your repair lasts.
- Mistake #1: Using the Wrong Glue. Never, ever use craft glue, a hot glue gun, or standard spray adhesive. It will fail in the heat and could leave you with an even bigger mess. Only use high-temperature adhesive made specifically for headliners.
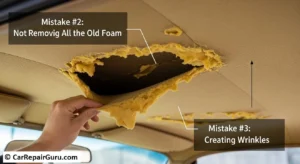
- Mistake #2: Not Removing All the Old Foam. This is the number one reason for a failed DIY replacement. The new adhesive will not stick to the dusty, crumbly residue of the old foam. The board must be perfectly clean.
- Mistake #3: Creating Wrinkles. When applying the new fabric, always smooth it with your hand from the center outwards. Pulling or stretching the fabric will inevitably lead to wrinkles that are impossible to remove.
Final Thoughts – Enjoy Your Restored Car Interior
A sagging headliner is a fixable problem. A few well-placed pins can provide an immediate fix, but for a truly satisfying and long-lasting solution, a full DIY replacement is a fantastic weekend project. By taking your time and using the right materials—especially the right headliner adhesive and foam-backed fabric—you can save hundreds of dollars and restore your car’s interior to its former glory.
Have a question about your project or a tip of your own? Drop a comment below!
Frequently Asked Questions (FAQ)
Can you fix a sagging headliner with a steam cleaner?
No, this is a common myth that can cause more harm than good. While steam might temporarily shrink the fabric, it introduces moisture that will further damage the foam and the backing board, making the problem much worse in the long run.
How long does it take to replace a car headliner?
For a first-timer, it’s wise to set aside a full afternoon, about 4-6 hours. This accounts for careful removal of trim, the tedious cleaning process, application of the new fabric, and reinstallation.
What is the best adhesive for a car headliner?
The best choice is a high-temperature, aerosol spray adhesive specifically formulated for headliners. Brands like 3M Headliner & Fabric Adhesive or Permatex Body Shop Headliner Adhesive are industry standards because they are designed to withstand the extreme temperatures inside a car.
Can I just re-glue the old fabric back on?
It is not recommended. The fabric didn’t just come unglued; it separated because the foam layer behind it has disintegrated into dust. Trying to spray new glue onto this powdery mess will result in a failed repair within days or weeks. You must remove the old fabric and foam to create a clean surface for the new material.