Ever seen that little U-shaped warning light with an exclamation point pop up on your dashboard and felt a small pang of anxiety? That’s your Tire Pressure Monitoring System (TPMS), and it’s trying to tell you something important. But don’t worry—addressing it is one of the easiest and most essential car maintenance tasks you can learn.
Learning how to properly inflate car tires isn’t just about turning off a pesky light. It’s a fundamental skill that keeps you safer on the road, saves you money at the gas pump, and even makes your car more enjoyable to drive. This guide will walk you through everything you need to know, from finding the right pressure to filling up at a gas station or in your own driveway.
- Why Proper Tire Inflation is Non-Negotiable
- The Essential Tools for the Job
- Step 1 – Find Your Car’s Recommended Tire Pressure (PSI)
- Step 2 – How to Check Your Current Tire Pressure
- Step 3 – The Guide to Inflating Your Tires
- Take Control of Your Ride
- Frequently Asked Questions (FAQ)
- How often should I check my tire pressure?
- What are the signs of underinflated tires?
- What happens if I overinflate my tires?
- Does tire pressure change with the temperature?
Why Proper Tire Inflation is Non-Negotiable
Before we get our hands dirty, let’s talk about why this 5-minute task is so critical. Think of your tires as the foundation of your car’s performance. If the foundation is weak, everything built on top of it suffers.
Safety First: This is the big one. Underinflated tires can flex too much, leading to overheating and a potential blowout—a terrifying experience at any speed. They also reduce your handling precision and can significantly increase your stopping distance in an emergency. Properly inflated tires grip the road exactly as they were designed to.
Save Money on Gas: The U.S. Department of Energy estimates that keeping your tires properly inflated can improve your gas mileage by up to 3%. It might not sound like much, but with today’s fuel prices, those savings add up over a year. Underinflated tires create more rolling resistance, forcing your engine to work harder for every mile.
Extend Tire Life: Tires are expensive. You want them to last as long as possible. When a tire is underinflated, the outer edges of the tread wear down prematurely. If it’s overinflated, the center of the tread wears out first. Correct car tire pressure ensures the tread wears evenly across its surface, maximizing its lifespan.
A Smoother, Better Ride: Your tires are part of your vehicle’s suspension system. When they are inflated correctly, they absorb bumps and road imperfections, giving you a smoother and more comfortable ride.
The Essential Tools for the Job
You don’t need a professional mechanic’s toolbox for this. You just need two simple things:
- A Reliable Tire Pressure Gauge: This is a must-have for every glove box. Don’t rely on the built-in gauges on gas station air hoses, which are notoriously inaccurate from constant use and abuse.
- Digital Gauges: Easy to read, backlit for nighttime use, and very accurate.
- Pencil/Stick Gauges: Inexpensive and compact, but can be a little harder to read precisely.
- Dial Gauges: Offer a clear, analog dial that’s easy to read and generally very durable.
- An Air Source: This is where you get the air from. You have a few great options:
- Gas Station Air Pump: Available at most gas stations, though they often cost a few quarters or dollars to use.
- Portable Tire Inflator: Also called a portable air compressor, this is an incredibly convenient tool that plugs into your car’s 12V power outlet (the old cigarette lighter).
- Home Air Compressor: If you have one in your garage for other tools, it will work perfectly with the right attachment.
Step 1 – Find Your Car’s Recommended Tire Pressure (PSI)

This is the most important step, and it’s where most people make a mistake. The correct tire pressure PSI is not the number printed on the side of your tire.
Where to Find the Correct PSI:
Your car manufacturer has determined the optimal tire pressure for your specific vehicle model to balance safety, handling, and comfort. You can find this information in one of two places:
- The Sticker in the Driver’s Side Doorjamb: Open your driver’s side door and look at the frame of the car. You’ll see a sticker that lists your vehicle’s weight, production date, and the recommended cold tire inflation pressures for the front, rear, and spare tires. This is your go-to source.
- Your Owner’s Manual: If the sticker is missing or unreadable, the same information is always listed in your vehicle’s owner’s manual, usually in the maintenance or specifications section.
The “Max Press” Trap: What Not to Do
On the sidewall of your tire, you will see a pressure listed, often something like “Max. Press. 51 PSI.” This is not the pressure you should inflate your tires to. This number represents the maximum pressure the tire can safely hold, not the recommended pressure for your vehicle.
Using this number will lead to overinflated tires, resulting in a dangerously harsh ride and poor traction. Always use the pressure listed on your car’s doorjamb sticker.
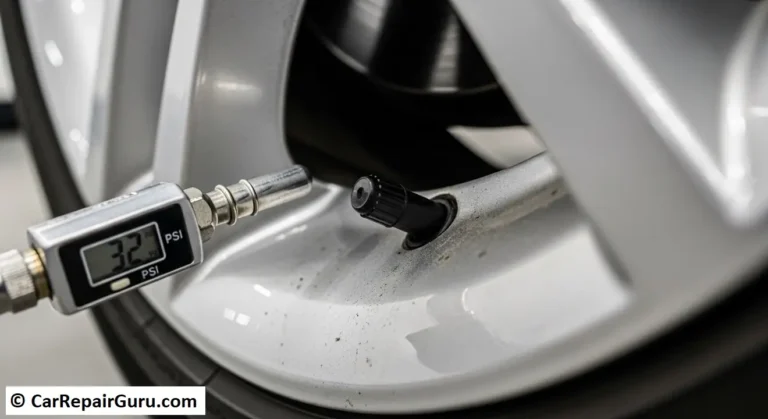
Step 2 – How to Check Your Current Tire Pressure
For the most accurate reading, always check your tires when they are “cold.” This doesn’t mean it has to be cold outside; it means your car has been parked for at least three hours or hasn’t been driven for more than a mile. Driving heats up the air inside your tires, causing it to expand and giving you a falsely high pressure reading.
Here’s the simple process:
1. Remove the Cap: Unscrew the small plastic cap from the tire’s valve stem and put it in your pocket so you don’t lose it.
2. Press the Gauge: Press your tire pressure gauge firmly and evenly onto the valve stem. You’ll hear a brief hiss of air. This is normal.
3. Read the Pressure: If you’re using a digital gauge, the number will appear on the screen. On a stick gauge, a small bar will pop out; read the number where the bar stops. On a dial gauge, the needle will point to the current PSI.
4. Compare and Repeat: Compare this reading to the recommended PSI from your doorjamb sticker. Make a mental note of how much air you need to add (or release). Repeat this process for all four tires. Don’t forget to check your spare tire, too—you never want to find it’s flat when you need it most!
Step 3 – The Guide to Inflating Your Tires
Now that you know how much air you need, it’s time to get to it. Here’s where to inflate car tires and how to do it using the two most common methods.
Method A – Using a Gas Station Air Pump
1. Get in Position: Park your car close enough to the air compressor so the hose can comfortably reach all four tires.
2. Set the Pressure: Most modern gas station air pump machines are digital. Set your target PSI on the machine using the plus (+) and minus (-) buttons.
3. Pay for Air: If required, insert your coins or use your credit card to start the machine.
4. Connect the Hose: Remove the valve stem cap from your first tire. Press the air hose nozzle firmly onto the valve stem and hold it. Some nozzles have a lever you need to flip to lock it in place. You will hear air flowing into the tire.
5. Fill and Wait: The machine will automatically stop and often beep once it reaches the target pressure you set. If you’re using an older, non-digital pump, you’ll need to add air in short bursts, removing the hose and checking the pressure with your own gauge periodically until you reach the correct level.
6. Replace the Cap: Screw the valve stem cap back on securely.
7. Repeat for All Tires: Move on to the next tire until all four are properly inflated.
Pro-Tip: If you accidentally overinflate a tire, simply press the small pin in the center of the valve stem with the nub on your pressure gauge (or a key) to release air in short bursts until you reach the correct PSI.
Method B – Using a Portable Tire Inflator at Home

A portable tire inflator is a fantastic investment for convenience and peace of mind.
1. Power It Up: Start your car or put it in accessory mode to avoid draining the battery. Plug the inflator’s power cord into your car’s 12V outlet.
2. Set the Target PSI: Just like the modern gas station pumps, most portable inflators have a digital screen. Use the buttons to set your target PSI.
3. Connect to the Tire: Screw the inflator’s hose connector onto the tire’s valve stem. This creates a secure, hands-free seal. The display will now show you the tire’s current pressure.
4. Start Inflating: Turn the inflator on. It will be noisy, but that’s normal! The best part is that it will run until it reaches your preset pressure and then shut off automatically.
5. Disconnect and Cap: Once it stops, turn the power switch off. Unscrew the hose from the valve stem and replace the cap.
Repeat as Needed: Move from tire to tire. It’s that easy!
Take Control of Your Ride
You’ve done it! You now know everything you need to check and inflate car tires like a pro. This simple, routine check is one of the most impactful things you can do for your vehicle’s health and your own safety.
Here’s a quick recap:
- Find the recommended PSI on the driver’s side doorjamb.
- Check your tire pressure when the tires are cold.
- Inflate to the recommended level using a gas station pump or portable inflator.
- Make it a monthly habit.
Make checking your tires a regular part of your vehicle maintenance routine. It’s a five-minute investment that pays off every single time you get behind the wheel.
Frequently Asked Questions (FAQ)
How often should I check my tire pressure?
You should check your tire pressure at least once a month and always before a long road trip. Regular checks are the best way to catch a slow leak before it becomes a bigger problem.
What are the signs of underinflated tires?
Beyond the TPMS light, common signs of underinflated tires include a “mushy” or sluggish feeling when steering, your car pulling to one side, or visible bulging of the tire’s sidewalls at the bottom.
What happens if I overinflate my tires?
Overinflating creates a much smaller contact patch with the road, which reduces traction. It also leads to a harsh, bumpy ride because the tire can’t properly absorb road imperfections, and it causes the center of the tread to wear out quickly.
Does tire pressure change with the temperature?
Yes, absolutely. As a general rule, tire pressure decreases by about 1 PSI for every 10°F drop in ambient temperature. This is why your TPMS light often comes on during the first cold snap of autumn. You’ll need to check and adjust your tire pressure more frequently as the seasons change.