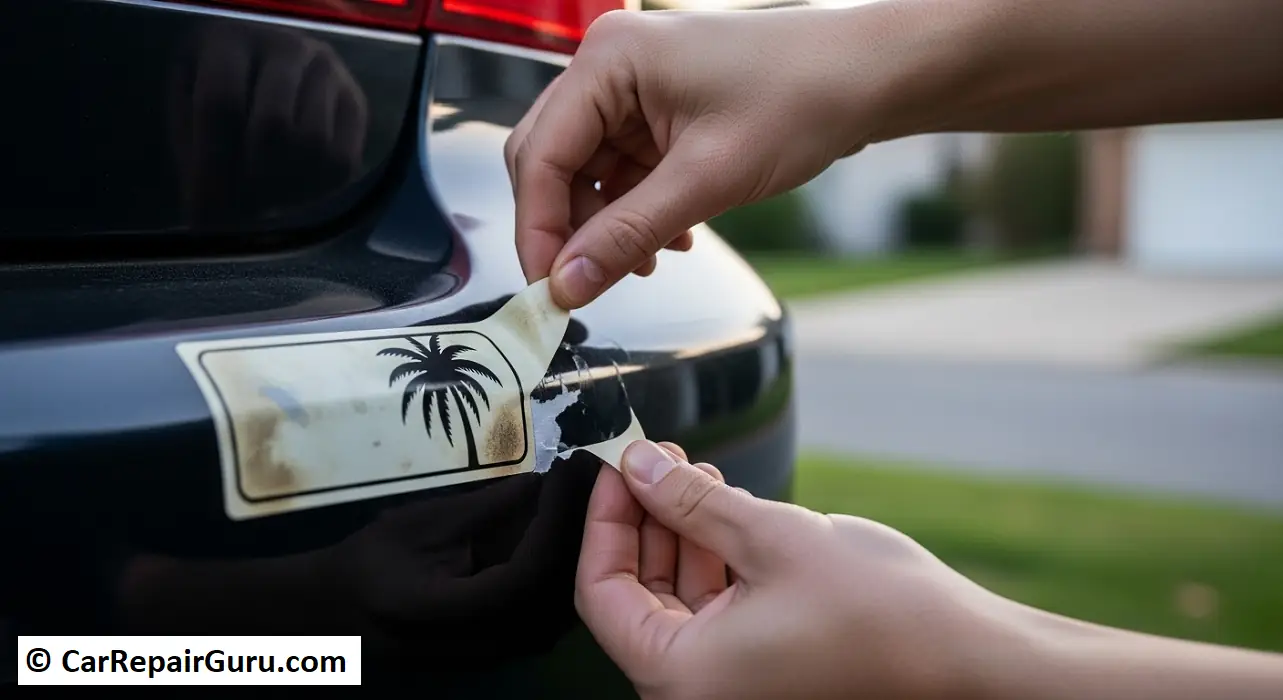
That sticker on your car—it seemed like a great idea at the time. Maybe it was a bumper sticker from a memorable road trip, a decal for your favorite band, or the dealership’s logo you never got around to taking off. Now, years later, it’s cracked, faded, and peeling, and frankly, it’s an eyesore.
You want it gone, but you’re worried. How do you remove an old car sticker without peeling off the paint or leaving a sticky, dirt-caked mess behind?
You’ve come to the right place. This guide will walk you through the safest, most effective ways to remove any sticker, decal, or vinyl graphic from your car’s body and windows. We’ll cover the essential tools, a step-by-step process for a perfect finish, and how to deal with that notoriously stubborn sticker residue. Let’s restore your car to its clean, sticker-free glory.
- Before You Start – Essential Tools & Preparation
- Gather Your Supplies (The Sticker Removal Toolkit)
- The First & Most Important Step – Clean the Area
- Method 1 – The Heat & Peel (Best for Stickers on Car Paint)
- Step-by-Step Instructions
- The Clean-Up – How to Get Sticker Residue Off Your Car
- Using a Commercial Adhesive Remover
- DIY Residue Removal Solutions
- Tackling Different Surfaces – How to Remove Decals from a Car Window
- The Glass Advantage – Using a Razor Blade Safely
- What NOT to Do – Common Mistakes That Damage Car Paint
- The Final Touch – Wash, Polish, and Wax
- A Clean Slate
- Frequently Asked Questions (FAQ)
- Will Goo Gone damage my car’s clear coat?
- How do you remove old, cracked, or brittle vinyl decals?
- Can I use a pressure washer to remove a sticker?
Before You Start – Essential Tools & Preparation
Great results start with great prep. Rushing this process is the number one cause of scratched paint and frustration. Before you touch that sticker, take five minutes to gather your supplies and prepare the surface. This simple step is the key to a damage-free removal.
Gather Your Supplies (The Sticker Removal Toolkit)
You likely have most of these items around the house already.
- Heating Element: A standard hairdryer is the perfect tool for this job. It provides gentle, controllable heat. A heat gun can also be used, but exercise extreme caution as it can easily get hot enough to damage paint and plastic trim.
- Prying Tool: Forget metal putty knives or screwdrivers. You need something soft. A plastic razor blade, an old credit card, or a plastic trim removal tool is ideal. Your fingernail can also work in a pinch.
- Adhesive Remover: You have options here. Commercial products like Goo Gone Automotive or 3M Adhesive Remover are specifically formulated for this. Alternatively, you can use isopropyl (rubbing) alcohol or even WD-40 as an effective sticker residue remover for your car.
- Cleaning Supplies: A bucket with car wash soap and water, plus at least two soft, clean microfiber towels.
- Finishing Touch: A quality car wax or paint sealant to protect the area after you’re done.
The First & Most Important Step – Clean the Area
Never try to remove a sticker from a dirty car. The surface around the decal is covered in tiny particles of dirt and grit. If you start scraping or rubbing without cleaning first, you’re essentially grinding that grit into your car’s clear coat, creating a web of fine scratches.
Simply wash the sticker and the surrounding few inches with car soap and water. Rinse it thoroughly and dry the area completely with a microfiber towel. Now you’re ready to get started.
Method 1 – The Heat & Peel (Best for Stickers on Car Paint)
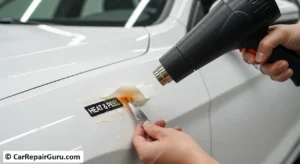
This is the gold-standard technique for a safe way to remove stickers from car paint. The secret isn’t force; it’s heat. Applying gentle heat softens both the vinyl sticker material and the adhesive underneath, making it pliable and encouraging it to release its grip on your paint.
Step-by-Step Instructions
- Step 1: Apply Gentle Heat
Turn your hairdryer to a medium or high heat setting. Hold it about 5-6 inches away from the sticker. Move the hairdryer continuously back and forth across the entire surface, like you’re spray-painting. Pay extra attention to the edges. Do this for about 30 to 60 seconds. You’ll notice the sticker or decal soften. - Step 2: Gently Pry a Corner
Test the corner with your fingernail. If the sticker is warm enough, you should be able to lift a corner easily. If it resists, apply a little more heat. Once you have a corner lifted, use your plastic razor blade or credit card to get underneath it. - Step 3: Peel Slowly and Steadily
This is where patience pays off. Grab the lifted corner and begin peeling. The key is to pull the sticker back on itself at a very low, almost flat angle—don’t pull straight up. This low angle puts less stress on the paint. Pull with slow, consistent pressure. If the sticker starts to tear or feels like it’s fighting you, stop and apply more heat to that section before continuing. - Step 4: Address the Aftermath
Congratulations, the sticker is off! But more often than not, you’ll be left with a sticky square of adhesive residue. Don’t worry, that’s our next step.
The Clean-Up – How to Get Sticker Residue Off Your Car
Now that the vinyl part is gone, it’s time to tackle the sticky mess it left behind. This is where your adhesive remover comes in. Never try to dry-scrub the residue, as this can mar the finish.
Using a Commercial Adhesive Remover
Products like Goo Gone Automotive are designed precisely for this.
- Instructions: Apply a small amount of the product to a clean microfiber towel, not directly onto the car.
- Let the saturated part of the towel sit on the residue for 30-60 seconds to allow the remover to penetrate the adhesive.
- Gently rub the area in small, circular motions. The residue should begin to dissolve and clump together.
- Use a clean, damp section of the towel to wipe the dissolved residue and the remover off the paint.
DIY Residue Removal Solutions
If you don’t have a commercial product, these household items work well.
- Isopropyl Alcohol: It’s a great degreaser and is safe on modern clear coats. Apply some to a microfiber towel and rub the residue until it’s gone.
- WD-40: This surprisingly effective method works by breaking down the adhesive’s bond. Spray a small amount onto a microfiber towel, lay it on the residue for a minute, and then wipe it away. CRITICAL STEP: WD-40 leaves an oily film. You must immediately wash the area with car soap and water to remove this film before moving on.
Tackling Different Surfaces – How to Remove Decals from a Car Window
Glass is a different ballgame. Since glass is much harder than your car’s clear coat, you have a few more options. This makes removing decals from a car window a bit easier.
The Glass Advantage – Using a Razor Blade Safely
While a metal razor is a huge no-no on paint, it can be used carefully on glass.
- Clean the Glass: Just like with paint, wash the window to remove any abrasive grit.
- Heat the Decal: While optional on glass, heating the decal for 30 seconds will still make the job much easier.
- Shave it Off: Take a new, sharp, single-edge razor blade. Lubricate the glass with some soapy water or glass cleaner. Hold the blade at a low 30-degree angle to the glass and use short, steady strokes to push under the sticker. The decal should peel off in clean strips.
- Clean the Residue: Any leftover adhesive can be quickly removed with rubbing alcohol or your favorite glass cleaner and a clean microfiber towel.
What NOT to Do – Common Mistakes That Damage Car Paint
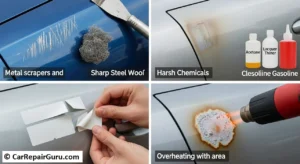
Knowing what to do is important, but knowing what not to do can save you from a costly trip to the body shop. Avoid these common mistakes at all costs:
- Don’t Use: Metal scrapers, steel wool, kitchen scouring pads, or metal razor blades on your car’s paint. They will instantly and permanently scratch it.
- Don’t Use: Abrasive polishing compounds or harsh chemicals like acetone, lacquer thinner, or gasoline. These can melt the clear coat and damage the paint underneath.
- Don’t Rush: Peeling the sticker too quickly can cause it to tear into a hundred tiny pieces, making the job much harder.
- Don’t Overheat: If you’re using a heat gun, keep it moving and far from the surface. Holding it in one spot for too long can bubble or even burn the paint.
The Final Touch – Wash, Polish, and Wax
You’ve done it! The sticker and the residue are completely gone. But don’t stop just yet. The solvents in the adhesive remover have likely stripped away any wax or sealant that was protecting your paint.
- Wash: Give the entire area one final, gentle wash with car soap and water to neutralize and remove any remaining chemicals.
- Polish (Optional): Sometimes, especially with very old stickers, you might see a faint outline or “ghosting” where the sticker used to be. This is because the surrounding paint has faded slightly from UV exposure. A light-duty car polish applied to the area can often blend this in perfectly.
- Wax: This is the most crucial final step. Apply a fresh coat of car wax or paint sealant to the area. This will protect the newly exposed paint from the sun, rain, and dirt, ensuring it blends seamlessly with the rest of your car.
A Clean Slate
There you have it—a clean, smooth, sticker-free surface. By following these steps—Clean, Heat, Peel, Remove Residue, and Protect—you can confidently tackle any old sticker or decal. With the right tools and a little bit of patience, you’ve successfully restored your car’s flawless finish.
Have a sticker removal tip we missed? Share it in the comments below
Frequently Asked Questions (FAQ)
Will Goo Gone damage my car’s clear coat?
The specific Goo Gone Automotive formula is designed to be safe on modern factory clear coats when used as directed. Always wash the area with soap and water after use. It’s always a good practice to test any new product on a small, inconspicuous area first.
How do you remove old, cracked, or brittle vinyl decals?
These are the toughest. They require more patience and more heat. You may have to heat and scrape off small chunks at a time. For large, professionally installed vinyl graphics that are badly degraded, a tool called an “eraser wheel” or “caramel wheel” that attaches to a drill is a professional’s secret weapon for removing them without damaging paint.
Can I use a pressure washer to remove a sticker?
This is not recommended. While it might seem like a fast solution, a pressure washer can easily catch the edge of a sticker and peel up the paint or clear coat right along with it, causing significant damage.