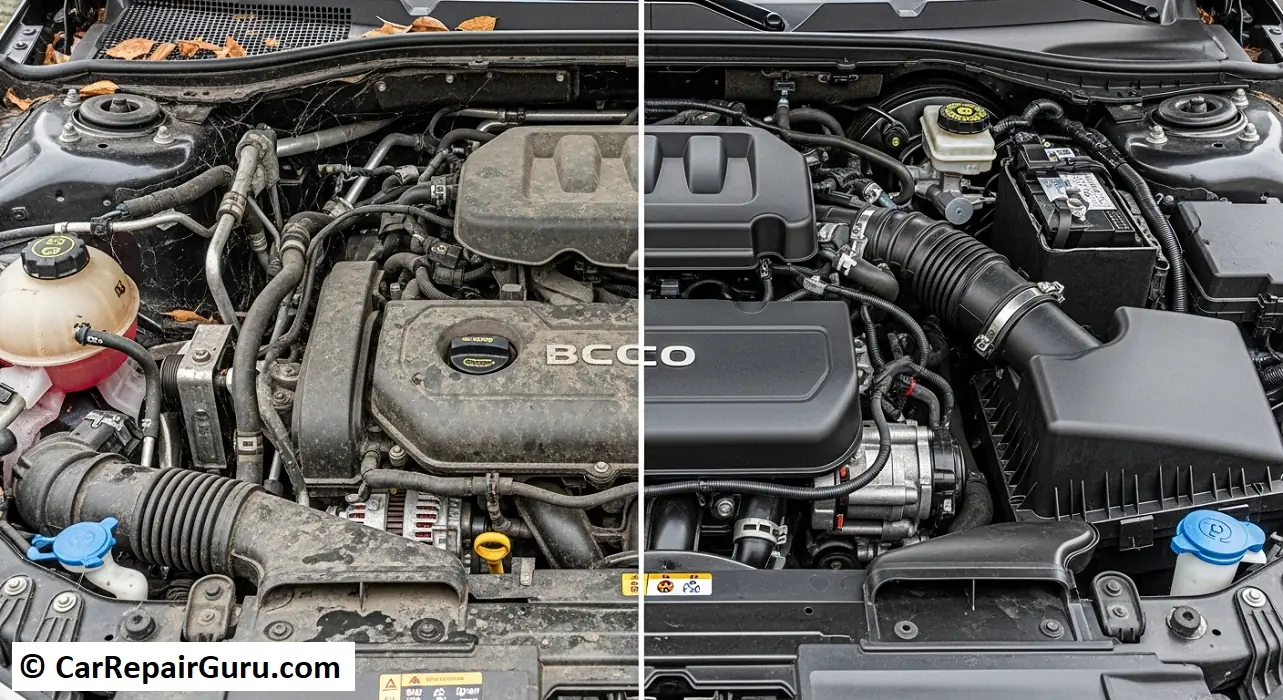
Ever pop the hood of your car, whether to check the oil or just out of curiosity, and been met with a depressing sight? A thick layer of dust, greasy grime caked onto every surface, and a few stray leaves tucked into corners. It’s not exactly inspiring.
A clean engine bay is more than just a badge of honor for car enthusiasts. It’s practical, smart, and one of the most satisfying DIY jobs you can do. But the thought of spraying water into that complex maze of wires and metal can be terrifying, right? What if you break something?
Fear not. This is your ultimate guide on how to clean an engine bay safely and effectively. We’ll walk you through the entire process, from preparation to the final professional-looking finish. By the end, you’ll see that a proper car engine cleaning is not only safe but also incredibly beneficial for:
- Spotting Leaks Early: A clean engine makes it easy to see fresh oil, coolant, or fluid leaks before they become major problems.
- Easier Maintenance: Working on a clean engine is faster, easier, and a lot less messy.
- Better Heat Dissipation: A thick layer of sludge can trap heat. A clean engine can run slightly cooler and more efficiently.
- Increased Resale Value: A pristine engine bay shows potential buyers that the car has been well-cared for.
Ready to transform that greasy mess into something you’re proud to show off? Let’s get started.
- Before You Start: Essential Tools and Supplies
- Choosing Your Weapon: Engine Degreaser vs. All-Purpose Cleaner (APC)
- When to Use a Heavy-Duty Engine Degreaser
- When an All-Purpose Cleaner (APC) is Enough
- Prep is Key: How to Prepare Your Engine for a Safe Wash
- Special Considerations: Cleaning Modern, Classic, and EV/Hybrid Engine Bays
- Modern Cars (2000s – Present)
- Classic & Older Cars (Pre-1990s)
- A Word of Extreme Caution for Hybrids and EVs
- The Ultimate 5-Step Engine Bay Cleaning Process
- Step 1: Apply Your Engine Degreaser or APC
- Step 2: Agitate the Grime
- Step 3: Rinse Carefully and Correctly
- Step 4: Dry the Engine Bay Thoroughly
- Step 5: Dress and Protect (The “Like a Pro” Finish)
- Engine Cleaning Mistakes to Avoid at All Costs
- A Clean Engine is a Happy Engine
- Frequently Asked Questions About Engine Bay Cleaning
- How often should I clean my engine bay?
- Can you really pressure wash an engine bay?
- Is it better to clean an engine bay hot or cold?
- What is the best engine degreaser?
Before You Start: Essential Tools and Supplies
First things first, let’s gather our gear. Having the right tools on hand makes the entire process smoother and safer. You don’t need a professional detailing setup, just a few key items.
- Cleaners: A good All-Purpose Cleaner (APC) and/or a dedicated engine degreaser. We’ll discuss which to use below.
- Brushes: A variety of soft-bristled detailing brushes. A long-handled wheel brush is great for reaching deep, and a few smaller, toothbrush-style brushes are perfect for tight spots.
- Protection: Standard plastic grocery bags and some painter’s tape or aluminum foil.
- Water Source: A simple garden hose with an adjustable spray nozzle. Crucially, you need a low-pressure setting.
- Drying: A handful of clean microfiber towels are essential. For best results, a leaf blower or a source of compressed air is a game-changer.
- Dressing/Protectant: A water-based plastic and rubber protectant (like 303 Aerospace Protectant or a dedicated engine dressing) for that finishing touch.
- Safety Gear: Don’t forget gloves to keep the grease off your hands and safety glasses to protect your eyes from splashes.
Choosing Your Weapon: Engine Degreaser vs. All-Purpose Cleaner (APC)
Walking down the car care aisle, you’ll see a dozen different bottles. Which one is right for your engine bay cleaning? The choice depends entirely on how dirty your engine is.
When to Use a Heavy-Duty Engine Degreaser
- Best for: Years of thick, caked-on oil, stubborn grease, and heavy road grime. If your engine looks more black than silver, this is your tool.
- How it works: These are powerful, often solvent-based cleaners designed specifically to dissolve tough petroleum deposits. Brands like Gunk or SuperClean are popular for a reason—they are incredibly effective on neglected engines.
- Pro-Tip: This is the go-to choice for older cars, project cars, or any vehicle with known oil leaks that have coated the engine in gunk.
When an All-Purpose Cleaner (APC) is Enough
- Best for: Routine cleaning, light to moderate dust, and fresh grime.
- How it works: An APC is a versatile, water-based cleaner that’s much gentler on surfaces. It’s perfect for the plastics, rubber hoses, and painted surfaces in a modern engine bay.
- Pro-Tip: For a newer car or one that’s been maintained regularly, a good APC (like Chemical Guys All-Clean+ or Meguiar’s D101) diluted per the instructions is often the safest and most effective option.
The Verdict: Always start with the mildest cleaner first (APC). If it’s not cutting through the grime after a bit of scrubbing, then you can step up to the best engine degreaser for the job. Avoid using acidic wheel cleaners, as they can permanently stain or etch bare aluminum components.
Prep is Key: How to Prepare Your Engine for a Safe Wash
This is the most important part of the entire process. Proper preparation is what separates a successful safe engine bay wash from a costly mistake. Take your time here.
1. Work on a Cool Engine: Never, ever spray a cold liquid onto a hot engine. The rapid temperature change can cause thermal shock, potentially cracking metal parts like the exhaust manifold or engine block. Let the car sit for at least an hour, or until the engine is just slightly warm to the touch.
2. Remove Loose Debris: Before you get anything wet, use a brush or compressed air to remove any loose leaves, twigs, dirt, and other debris.
3. Protect Sensitive Components: This step directly answers the most common question: what to cover when cleaning an engine bay. Water and sensitive electronics don’t mix. Use your plastic bags and tape to cover the following:
- Alternator: The alternator generates your car’s electricity. It has open vents that can be easily damaged by direct water spray. Cover it securely.
- Air Intake/Filter: If you have an exposed, open-element air filter (like on many cold air intake systems), cover it completely. You do not want water being sucked into your engine. A standard, enclosed factory airbox is usually fine.
- Fuse Box & ECU: While often weather-resistant, it’s smart to cover the main fuse box and the Engine Control Unit (ECU, your car’s brain) to be extra safe.
- Exposed Electrical Connectors: Do a quick visual check for any cracked, frayed, or obviously exposed wiring plugs and give them a quick cover.
Special Considerations: Cleaning Modern, Classic, and EV/Hybrid Engine Bays
Not all engine bays are built the same. Your approach should change based on the vehicle’s technology and age.
Modern Cars (2000s – Present)
Modern engines are covered in plastic shrouds, complex wiring, and a host of sensors. The good news is these plastic covers do a great job of protecting the most vital components. The challenge is cleaning around the intricate systems. Pay close attention to covering the alternator and any exposed sensor plugs. Be gentle, and an APC is often all you need.
Classic & Older Cars (Pre-1990s)
Learning how to clean a classic car engine requires a different focus. These engines have fewer complex electronics but more exposed mechanical parts that hate water.
- Distributor: This is a top priority. Water inside the distributor cap will prevent the car from starting. Cover it meticulously.
- Carburetor: If your car has a carburetor, ensure its air intake is completely covered.
- The wiring is older and can be more brittle. Be extra careful when covering it and when rinsing.
A Word of Extreme Caution for Hybrids and EVs
This is critical. Hybrid and Electric Vehicles have high-voltage systems, typically identified by thick, bright orange cables and components.
- DO NOT spray water on or near these orange components. The risk of severe electrical shock and catastrophic damage to the vehicle is extremely high.
- For cleaning a hybrid engine bay or an EV motor compartment, the safest method is a waterless approach. Use a quality spray cleaner on a microfiber towel to wipe down surfaces, staying far away from the orange high-voltage system. For a deep clean, this job is best left to a professional who specializes in EVs.
The Ultimate 5-Step Engine Bay Cleaning Process
With your prep work done, it’s time for the fun part. Follow these engine detailing tips for a flawless finish.
Step 1: Apply Your Engine Degreaser or APC
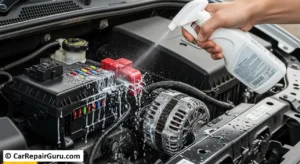
Working on your cool, prepped engine, liberally spray your chosen cleaner all over the engine bay. Start from the bottom and work your way up. This prevents the cleaner from running down onto a dry surface and causing streaks. Don’t be shy—get into all the nooks and crannies and apply an extra coat on especially greasy areas. Let the cleaner dwell for 3-5 minutes, but don’t let it dry.
Step 2: Agitate the Grime
This is where the magic happens. A cleaner can only do so much on its own. Grab your brushes and start scrubbing. Use your long-handled brush to agitate large, easy-to-reach surfaces. Use your smaller brushes to get into tight spots, around hoses, and on intricate parts. You’ll see the grime start to break down and lift away.
Step 3: Rinse Carefully and Correctly
It’s time for your safe engine bay wash. Set your garden hose nozzle to a low-pressure setting, like “shower” or “mist.” Never use a high-pressure washer, as it can force water past seals and into electrical connectors.
Rinse the engine bay thoroughly from the top down, allowing the soap and grime to flow down and out. Rinse methodically, but don’t blast any single area for too long, especially near the components you covered. The goal is simply to wash away the loosened dirt and cleaner.
Step 4: Dry the Engine Bay Thoroughly
Getting the engine bay dry quickly is just as important as washing it correctly.
- Best Method: Use a leaf blower or compressed air. This is the fastest way to blow water out of every crevice, connector, and tight spot where it might linger.
- Good Method: Grab your stack of clean microfiber towels and start blotting and wiping everything dry. It takes longer but is just as effective.
- Once the majority of the water is gone, you can remove the plastic coverings. As a final step, you can start the engine and let it run for 5-10 minutes. The heat will help evaporate any remaining moisture.
Step 5: Dress and Protect (The “Like a Pro” Finish)
Want that deep, rich, better-than-new look? Apply a dressing. Spray a water-based plastic and rubber protectant onto a microfiber applicator pad (not directly onto the engine) and wipe down all the plastic covers, hoses, and black trim. This restores color, adds a satin (not greasy) shine, and provides crucial UV protection to prevent fading and cracking.
Engine Cleaning Mistakes to Avoid at All Costs
Keep these simple rules in mind to ensure a perfect job every time.
❌ Using a High-Pressure Washer. The number one mistake. It’s too risky. Stick to a garden hose.
❌ Cleaning a Hot Engine. A recipe for disaster. Always wait for it to cool down.
❌ Soaking Electrical Components. Cover them properly and rinse intelligently.
❌ Using Harsh, Acidic Cleaners. They can cause permanent damage to metal and plastic.
❌ Forgetting to Rinse Thoroughly. Dried-on cleaner can leave stains and attract more dirt.
A Clean Engine is a Happy Engine
There you have it—a complete, safe, and effective guide to transforming your engine bay from grimy to gleaming. By following the key steps—Prep, Clean, Dry, and Protect—you can tackle this job with total confidence.
You’ll not only love the way it looks, but you’ll also make your car easier to maintain and help preserve its value for years to come. Now, go pop that hood and get to work. You’ve got this.
Have any of your own engine bay cleaning tips or a question we didn’t cover? Leave a comment below!
Frequently Asked Questions About Engine Bay Cleaning
How often should I clean my engine bay?
For most drivers, a good cleaning once or twice a year is plenty to keep things in great shape. If you live in a dusty climate or go off-roading, you might do it more often.
Can you really pressure wash an engine bay?
While some professional detailers do it with extreme caution, it is highly discouraged for DIYers. The risk of forcing water where it doesn’t belong is just too high. A garden hose is the safest bet.
Is it better to clean an engine bay hot or cold?
Always cold or, at most, slightly warm to the touch. Never hot.
What is the best engine degreaser?
It depends on the job. For light-duty work, a quality All-Purpose Cleaner is fantastic. For heavy-duty grease, purpose-built degreasers from brands like Gunk, SuperClean, or Chemical Guys are excellent choices.