That sound. If you’re a car owner, you know the one. It’s that unmistakable click-click-click or popping noise your car makes when you’re pulling out of a parking spot or making a sharp turn. It’s one of the most classic signs of car trouble, and it’s almost always pointing a greasy finger at a failing drive axle.
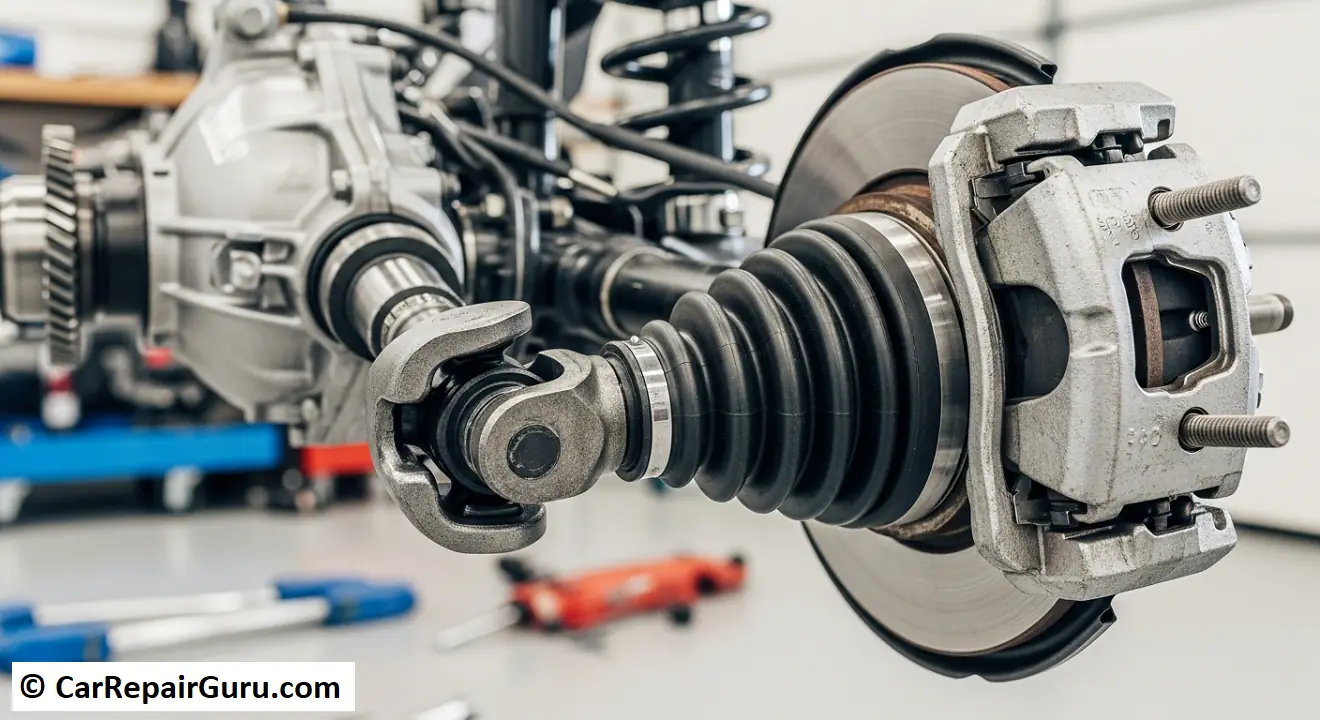
But don’t panic. While it sounds serious, this is a common wear-and-tear issue. Your car’s drive axle, more commonly known as a CV axle, is a mechanical hero working silently behind your wheels. It’s the critical link that takes the rotational power from your transmission and delivers it to your wheels, allowing them to spin and propel you forward while also flexing up and down with the suspension and turning left and right with your steering.
This guide is designed to be your one-stop resource. We’ll walk you through everything you need to know, from diagnosing the symptoms and understanding the costs to a detailed, step-by-step guide on how to replace a car drive axle yourself. Whether you’re a curious owner trying to understand your mechanic’s quote or a confident DIYer ready to get your hands dirty, you’re in the right place.
- Is My Drive Axle Bad? 5 Common Symptoms to Look For
- Drive Axle Replacement Cost – DIY vs. Hiring a Mechanic
- Professional Replacement Cost
- DIY Replacement Cost
- The Verdict – Should You Do It Yourself?
- Tools & Parts Needed for a CV Axle Replacement
- Required Parts
- Essential Tools
- 5 Critical Mistakes to Avoid During a Drive Axle Replacement
- How to Replace a Front Drive Axle – A 9-Step Guide
- Step 0 – Safety First!
- Step 1 – Loosen the Axle Nut & Lug Nuts
- Step 2 – Raise and Secure the Vehicle
- Step 3 – Remove the Axle Nut
- Step 4 – Disconnect Suspension Components
- Step 5 – Push the Axle Out of the Hub
- Step 6 – Pop the Inner Axle Out of the Transmission
- Step 7 – Install the New Drive Axle
- Step 8 – Reassemble Everything
- Step 9 – Torque to Spec
- After the Installation – Final Checks and the All-Important Test Drive
- Pre-Drive Inspection Checklist
- Performing the Test Drive
- Final Thoughts – Your Next Steps
- Frequently Asked Questions (FAQ)
- How long does it take to replace a drive axle?
- Can I drive with a bad CV axle?
- Should I replace both drive axles at the same time?
- What’s the difference between a CV joint and a CV axle?
Is My Drive Axle Bad? 5 Common Symptoms to Look For
A failing drive axle is almost always a failing Constant Velocity (CV) joint, which is the flexible joint at either end of the axle shaft. These joints are packed with grease and covered by a protective rubber “boot.” When that boot tears, the grease flies out, and dirt gets in, quickly destroying the joint. Here are the five tell-tale symptoms of a bad drive axle to watch—and listen—for.
- Clicking or Popping Noise When Turning. This is the number one sign. The noise is caused by worn-out bearings inside the outer CV joint binding and releasing as the wheels are turned. It will be most noticeable during sharp, low-speed turns, like in a parking lot.
- Vibration While Driving. A damaged inner CV joint or a bent axle shaft can create a noticeable vibration that gets worse as you accelerate. You might feel it in the steering wheel or through the floor of the car.
- Grease on the Inside of Your Tire or Wheel Well. This is a dead giveaway. Take a look behind your front wheels. If you see thick, dark grease splattered on the suspension components or the inner barrel of your wheel, you have a torn CV boot. Even if you don’t hear a noise yet, the joint is now unlubricated and on a fast track to failure.
- A “Clunking” Sound. If you hear a distinct “clunk” when you shift from Drive to Reverse or put the car into gear, it can indicate excessive play in worn-out inner CV joints.
- Steering or Handling Issues. In very worn cases, a failing axle can cause minor steering wander or a feeling of looseness in the front end, though this is a less common symptom.
Drive Axle Replacement Cost – DIY vs. Hiring a Mechanic
Before you decide to tackle this job, it’s smart to weigh the costs. The price can vary significantly depending on whether you pay a professional or do it yourself.
Professional Replacement Cost
If you take your car to a repair shop, you can expect the CV axle replacement cost to be anywhere from $250 to $850 per axle. This price range is influenced by several factors:
- Parts: The cost of the axle assembly itself. A remanufactured axle is cheaper than a brand-new OEM (Original Equipment Manufacturer) part.
- Labor: Mechanics typically charge for 1-3 hours of labor for this job. Rates can range from $80 to over $200 per hour depending on the shop and your location.
- Vehicle: Luxury and European cars often have more expensive parts and more complex suspension designs, driving the price up.
DIY Replacement Cost
This is where you can save a significant amount of money. The primary cost is the part itself. A new or remanufactured CV axle assembly typically costs between $60 and $200. The other potential costs are any specialized tools you might need to buy or rent, like a large axle nut socket or a torque wrench. If you already have a decent tool collection, your total out-of-pocket cost could be under $100.
The Verdict – Should You Do It Yourself?
Replacing a drive axle is an intermediate-level DIY task. It requires you to safely lift the vehicle, remove the wheel, and disconnect key suspension components. If you’re comfortable with that and have the right tools, you can save hundreds of dollars. However, if you’re not confident in your abilities or lack the proper safety equipment (especially jack stands), hiring a professional is the safest and best choice.
Tools & Parts Needed for a CV Axle Replacement
Gathering everything you need before you start is the key to a smooth and frustration-free repair. Here’s your checklist.
Required Parts
- New or Remanufactured CV Axle Assembly: Ensure it’s for the correct side (driver or passenger) of your specific vehicle.
- New Axle Nut: Most new axles come with one, but double-check. Never reuse the old one.
- New Cotter Pin: Also usually included.
- Transmission Fluid or Gear Oil: You will likely lose a small amount of fluid when you pull the old axle out. Check your owner’s manual for the correct type.
Essential Tools
- Safety First: Jack, Jack Stands, Wheel Chocks, Safety Glasses, and Mechanic’s Gloves.
- Sockets & Wrenches: A good metric or standard socket set and combination wrenches.
- Breaker Bar or Impact Wrench: For that stubborn axle nut.
- Large Axle Nut Socket: This is vehicle-specific. You can often rent a set from an auto parts store for free.
- Torque Wrench: Absolutely essential for safety. Do not attempt this job without one.
- Pry Bar: A long, sturdy pry bar is your best friend for popping the inner joint out.
- Hammer or Mallet: A dead-blow hammer or a small sledgehammer is useful.
- Pliers: For removing the old cotter pin.
- Drain Pan: To catch any spilled transmission fluid.
5 Critical Mistakes to Avoid During a Drive Axle Replacement
Before we get to the step-by-step guide, let’s cover the common pitfalls. Avoiding these mistakes will save you from turning a 3-hour job into a weekend-long nightmare.
- Damaging the Transmission Output Seal. The rubber seal where the axle enters the transmission is delicate.
- Mistake: Prying against the seal itself or using a sharp screwdriver.
- Solution: Use a proper pry bar and pry against the solid metal housing of the transmission. A quick, firm “pop” is what you want. Damaging this seal will cause a nasty fluid leak.
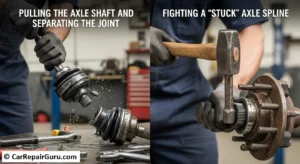
- Pulling the Axle Shaft and Separating the Joint. It’s tempting to grab the axle by its long shaft and pull. Don’t do it.
- Mistake: Yanking on the middle of the shaft can pull the inner joint apart, spilling bearings and grease everywhere.
- Solution: Always handle the axle by its solid ends. When installing the new one, push on the solid inner joint housing to seat it.
- Using the Wrong Tools (Especially No Torque Wrench). This isn’t a job where “good enough” is good enough.
- Mistake: Guessing the tightness of the axle nut with a breaker bar.
- Solution: Use a calibrated torque wrench. Under-tightening can cause the wheel bearing to fail, and over-tightening can destroy the new axle and the wheel bearing. It’s a critical safety step.
- Forgetting to Top Off Transmission Fluid. Some fluid will spill out. It’s a fact of life.
- Mistake: Ignoring the small puddle on the floor and not checking the fluid level after the job.
- Solution: After the car is back on level ground, check your transmission fluid and top it off with the correct type. Driving with low fluid will destroy your transmission.
- Fighting a “Stuck” Axle Spline. Rust can make the outer end of the axle feel like it’s welded to the wheel hub.
- Mistake: Smashing the threaded end of the axle with a steel hammer, mushrooming the tip and making it impossible to remove.
- Solution: Liberally spray the splines with penetrating oil. Thread the old axle nut back on a few turns to protect the threads, then give the nut a few firm taps with a hammer to break it loose.
How to Replace a Front Drive Axle – A 9-Step Guide
Alright, it’s time to get to work. This guide covers the most common procedure for a front-wheel-drive vehicle. While the exact suspension components may vary, the core principles are the same.
Step 0 – Safety First!
This is the most important step. Park your car on a flat, level, solid surface. Engage the parking brake firmly and place wheel chocks behind the rear wheels. NEVER, EVER work under a car that is only supported by a jack. Always use properly rated jack stands.
Step 1 – Loosen the Axle Nut & Lug Nuts
With the car still on the ground, use a pry bar to pop the center cap off your wheel to expose the large axle nut. Use your breaker bar and the correct axle nut socket to break this nut loose. It will be very tight. You may need to have someone press the brakes while you turn it. Don’t remove it completely, just loosen it a full turn. Then, loosen the lug nuts on the wheel.
Step 2 – Raise and Secure the Vehicle
Use your floor jack on the vehicle’s specified lift point to raise the front corner you’re working on. Place a jack stand securely under the frame rail or subframe, then lower the car onto the stand. Remove the lug nuts and the wheel.
Step 3 – Remove the Axle Nut
Now you can finish unscrewing the axle nut you loosened earlier. Remove it and the washer behind it.
Step 4 – Disconnect Suspension Components
To get the axle out, you need to create space by moving the wheel hub assembly (steering knuckle) out of the way. The most common method is to disconnect the lower ball joint. Remove its cotter pin and castle nut, then strike the side of the knuckle with a hammer to shock the joint loose. Alternatively, you might disconnect the tie rod end or the two large bolts holding the strut to the knuckle.
Step 5 – Push the Axle Out of the Hub
With the suspension disconnected, pull the entire hub assembly outward. This will give you the room to push the threaded, outer end of the CV axle back and out of the hub. If it’s stuck, use the nut-and-hammer trick described in the “Mistakes” section.
Step 6 – Pop the Inner Axle Out of the Transmission
This is the moment of truth. Position your drain pan under the spot where the axle enters the transmission. Find a solid point on the transmission case and wedge the tip of your pry bar between the case and the metal housing of the inner CV joint. Give the pry bar a few firm, sharp jolts. The axle should “pop” free from an internal C-clip. Now you can slide the entire drive axle assembly out of the car.
Step 7 – Install the New Drive Axle
Before installing, take a moment to compare the new axle with the old one. Make sure the length and spline counts are identical. Now, carefully guide the splined end of the new axle into the transmission. Make sure the splines are aligned. Push firmly on the inner joint housing until you feel and hear a solid “click.” This is the sound of the C-clip seating properly.
Step 8 – Reassemble Everything
This is the reverse of removal.
- Slide the outer end of the axle back through the wheel hub.
- Swing the hub assembly back into place and re-connect the suspension components you removed (e.g., the lower ball joint). Torque the nuts to the manufacturer’s specification.
- Install the washer and the new axle nut. Tighten it by hand for now—you’ll do the final torque on the ground.
Step 9 – Torque to Spec
Put the wheel back on and tighten the lug nuts. Lower the vehicle off the jack stand. Now, with the car on the ground, use your torque wrench to tighten the axle nut to the manufacturer’s exact specification. This is a very high torque value, often 150 ft-lbs or more. Once torqued, install the new cotter pin to lock the nut in place. Finally, use your torque wrench to tighten your wheel’s lug nuts in a star pattern.
After the Installation – Final Checks and the All-Important Test Drive

You’ve done the hard part, but the job isn’t finished until you’ve verified your work. These final checks are crucial for safety and peace of mind.
Pre-Drive Inspection Checklist
- Double-Check Your Torque: Go back and confirm that the axle nut and any suspension bolts you touched are torqued to spec.
- Look for Leftover Parts: A quick glance on the ground to ensure there are no “extra” nuts or bolts is always a good idea.
- Top Off Fluids: Now is the time to check your transmission fluid level. Use a funnel and add the correct fluid until the dipstick reads “Full.”
Performing the Test Drive
- Start in a Safe Area: Find an empty parking lot or a quiet road.
- Listen Carefully: With the radio off, perform several slow, full-lock turns in both directions. The original clicking noise should be completely gone.
- Feel for Vibrations: Drive straight and accelerate smoothly up to about 45 mph. The ride should be smooth, with no new vibrations.
- Check for Leaks: After a 5-10 minute drive, park on a clean, dry surface. Look underneath at the transmission seal where the new axle is installed. It should be perfectly dry. A single drip means the seal may have been damaged during installation.
Final Thoughts – Your Next Steps
Congratulations! You now understand the entire process of how to replace a car drive axle. You know how to spot the symptoms of a bad axle, how to weigh the costs, and what it takes to do the job right. The key takeaways are to always prioritize safety with jack stands, never guess on torque specifications, and double-check your work with a thorough test drive.
By tackling a job like this, you not only save a significant amount of money but also gain a deeper understanding of how your vehicle works.
Have you replaced a drive axle before? Share your experience or ask any questions in the comments below
Frequently Asked Questions (FAQ)
How long does it take to replace a drive axle?
A professional mechanic can typically complete a front drive axle replacement in 1-2 hours. For a first-time DIYer with the right tools, it’s wise to set aside 2-4 hours to allow for any stubborn parts or learning curves.
Can I drive with a bad CV axle?
It is strongly not recommended. While a car can sometimes be driven for a short time with a clicking axle, a complete failure is dangerous. The axle can break apart, causing a total loss of power to that wheel and potentially causing you to lose control of the vehicle.
Should I replace both drive axles at the same time?
Not necessarily. Drive axles wear out independently. If the boot on the other side is intact and it’s not making noise, there’s no immediate need to replace it. Only replace the one that has failed.
What’s the difference between a CV joint and a CV axle?
The CV axle is the entire shaft assembly. The CV joints are the flexible joints at each end of that shaft. In the past, people would rebuild the individual joints, but today, it’s far more time-effective and reliable to replace the entire CV axle assembly as a single unit.