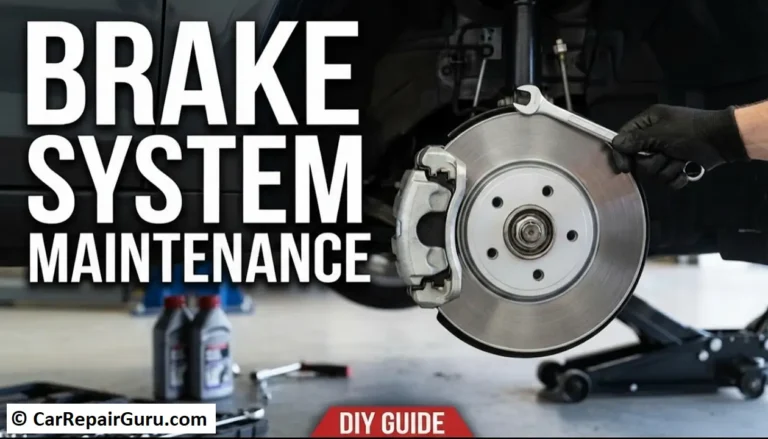
Your car’s ability to stop isn’t just a feature—it’s the most important safety system you have. And the unsung hero of that system? A small amount of hydraulic liquid called brake fluid. It’s the lifeblood of your brakes, yet it’s one of the most neglected fluids in the entire vehicle.
Over time, this essential fluid degrades by absorbing moisture, which can lead to a spongy brake pedal, corroded brake lines, or in a worst-case scenario, total brake failure. The good news is that performing a brake fluid flush is a straightforward maintenance task you can absolutely do yourself.
This guide will walk you through everything you need to know about how to replace brake fluid. We’ll cover why it’s so important, the tools you’ll need, and a detailed, step-by-step process to get the job done right, saving you money and keeping you safe on the road.
- Why is Replacing Your Brake Fluid So Important?
- What Brake Fluid Does (And Why It Fails)
- Top 5 Signs You Need to Change Your Brake Fluid
- How Often Should You Replace Brake Fluid?
- Critical Safety Precautions Before You Begin
- Handling Brake Fluid Safely
- Vehicle Safety is Non-Negotiable
- Getting Started – Tools, Materials, and Know-How
- Choosing the Right Brake Fluid – DOT 3, DOT 4, or DOT 5.1?
- Essential Tools and Materials Checklist
- Brake Fluid Flush vs. Bleeding – What’s the Difference?
- Comparing Brake Bleeding Methods – Which Is Right for You?
- Method 1 – The Two-Person Pump & Hold (Most Common)
- Method 2 – Vacuum Bleeding (Great for Solo DIYers)
- Method 3 – Pressure Bleeding (Fastest & Most Professional)
- How to Replace Brake Fluid – The Definitive DIY Guide
- The Step-by-Step Brake Fluid Flush Process
- Troubleshooting Common Problems After a Brake Fluid Change
- Problem – The Brake Pedal is Spongy or Goes to the Floor
- Problem – I Have a Leak Around the Bleeder Screw
- Problem – The ABS or Brake Warning Light is Now On
- Professional Brake Fluid Flush Cost vs. DIY
- Final Thoughts – Better Safety, Better Performance
- FAQ – Common Brake Fluid Questions
- What color should brake fluid be?
- Can I mix DOT 3 and DOT 4 brake fluid?
- What happens if you don’t change your brake fluid?
- How do you dispose of old brake fluid?
- Can I just top off my brake fluid instead of flushing it?
Why is Replacing Your Brake Fluid So Important?
Before we grab any wrenches, let’s understand what’s happening inside your brake lines. Understanding the “why” makes the “how” much easier.
What Brake Fluid Does (And Why It Fails)
Brake fluid is a hydraulic fluid, which means it’s designed to be non-compressible. When you press the brake pedal, the fluid in the master cylinder transfers that force perfectly through the brake lines to the brake calipers, which then squeeze the brake pads against the rotors, stopping your car.
The problem is that most brake fluid (DOT 3, 4, and 5.1) is hygroscopic. It’s a fancy word that means it loves to absorb moisture right out of the air, even through microscopic pores in the rubber hoses.
This absorbed water causes two major problems:
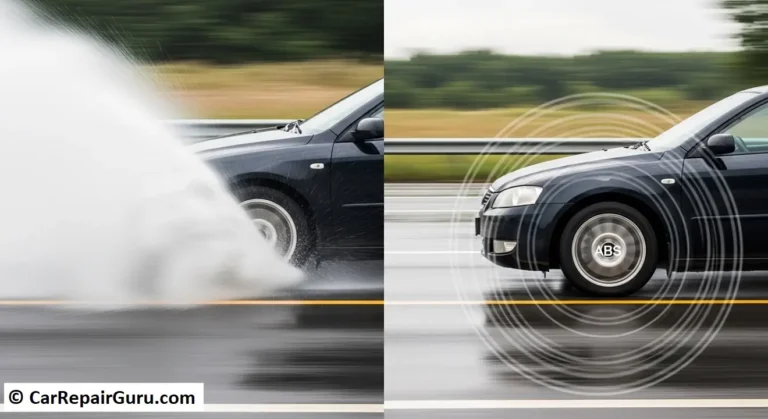
- Lowered Boiling Point: Fresh brake fluid has a very high boiling point (often over 400°F / 205°C). Water, as we know, boils at 212°F / 100°C. During heavy braking, your brakes get incredibly hot. If there’s too much water in the fluid, that water can boil and turn into steam. Steam is compressible, creating air bubbles in your lines. The result is a terrifyingly “spongy” or “mushy” brake pedal that sinks to the floor with little stopping power.
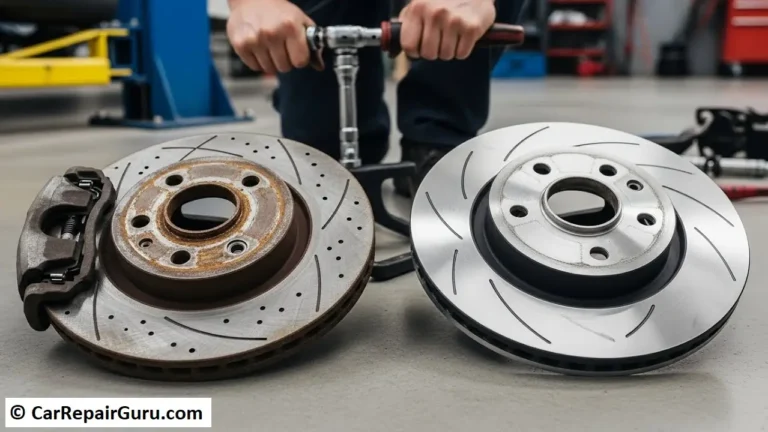
- Internal Corrosion: Water is the enemy of metal. Over time, moisture in the brake fluid will cause rust and corrosion to form on the inside of your brake lines, calipers, wheel cylinders, and expensive ABS (Anti-lock Braking System) module. This corrosion can lead to stuck calipers and costly repairs down the road.
Top 5 Signs You Need to Change Your Brake Fluid
Not sure when to change brake fluid? Your car will give you some clear warning signs.
- Spongy or Soft Brake Pedal: This is the #1 classic symptom. If your pedal feels squishy or travels further to the floor than it used to, it’s a strong sign of air or moisture in the lines.
- Dark or Murky Fluid Color: New brake fluid is nearly clear with a slight amber tint. Old, contaminated fluid will look dark brown or even black. A quick look at the reservoir can tell you a lot.
- ABS Light is On: While many things can trigger an ABS light, contaminated fluid or corrosion in the ABS module can sometimes be the culprit.
- Poor Stopping Performance: If you feel like your car is taking longer to stop than it used to, old fluid could be reducing the efficiency of the hydraulic system. This is something you can test to confirm your suspicions.
- You’ve Passed the Recommended Service Interval: Prevention is the best cure. Check your owner’s manual for the specific recommendation for your vehicle.
How Often Should You Replace Brake Fluid?
As a general rule, you should plan to replace brake fluid every 2 to 3 years, or every 30,000 to 45,000 miles, whichever comes first. However, always check your vehicle’s owner’s manual for the manufacturer’s specific recommendation.
Critical Safety Precautions Before You Begin
Safety is paramount when working on your brakes. This isn’t a step to skim over.
Handling Brake Fluid Safely
- Skin and Eye Irritant: Always wear nitrile gloves and safety glasses. If you get brake fluid on your skin, wash it off immediately with soap and water.
- Damages Car Paint: Brake fluid is a fantastic paint stripper. It will eat through your car’s clear coat and paint in minutes. Keep several clean, lint-free rags handy to wipe up any drips or spills the second they happen.
- Flammability: Keep brake fluid away from open flames or sparks.
Vehicle Safety is Non-Negotiable
- Use Jack Stands: Never, ever work under a vehicle that is only supported by a jack. Jacks can and do fail. Once the car is lifted, secure it with properly rated jack stands.
- Work on Level Ground: Ensure your car is parked on a flat, stable surface like a concrete garage floor or level driveway.
- Chock the Wheels: Before lifting the vehicle, place wheel chocks behind the wheels that will remain on the ground to prevent the car from rolling.
Getting Started – Tools, Materials, and Know-How
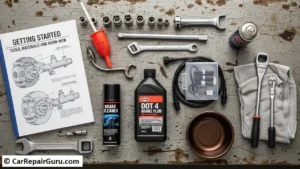
Let’s gather everything you’ll need to perform a clean and efficient brake fluid change.
Choosing the Right Brake Fluid – DOT 3, DOT 4, or DOT 5.1?
You’ll see these “DOT” ratings on the bottle. The most important rule is to use the type of fluid recommended by your vehicle’s manufacturer. You can usually find this printed on the cap of the brake fluid reservoir (master cylinder) or in your owner’s manual.
- DOT 3: The most common fluid for standard cars and light trucks.
- DOT 4: Has a higher boiling point than DOT 3. It’s often used in European cars, high-performance vehicles, or for vehicles that tow. You can use DOT 4 in a system that calls for DOT 3, but you cannot use DOT 3 in a system designed for DOT 4.
- DOT 5.1: Has an even higher boiling point. It’s compatible with DOT 3 and DOT 4 systems.
CRITICAL WARNING: Never mix DOT 5 (silicone-based) with DOT 3, 4, or 5.1 (glycol-based). DOT 5 is a purple, silicone-based fluid used in some classic cars and military vehicles. Mixing them will cause the fluid to gel and lead to complete brake system failure.
Essential Tools and Materials Checklist
- New Brake Fluid: 1-2 quarts (or liters) of the correct DOT rating from a new, sealed bottle. Once a bottle is opened, it starts absorbing moisture.
- Box-End Wrench: To fit the bleeder screws on your brake calipers (a 6-point or flare-nut wrench is even better to prevent rounding the screws). Common sizes are 8mm, 10mm, or 11mm.
- Clear Plastic Tubing: About 2-3 feet of tubing that fits snugly over the bleeder screw nipple.
- Clean Catch Bottle/Jar: An old water bottle or glass jar to catch the old, dirty fluid.
- Turkey Baster or Syringe: To remove the old fluid from the master cylinder reservoir.
- Jack and Jack Stands
- Lug Wrench
- Lint-Free Rags, Nitrile Gloves, and Safety Glasses
- A Friend (Optional but Highly Recommended): For the classic two-person bleeding method.
Brake Fluid Flush vs. Bleeding – What’s the Difference?
You’ll hear these terms used a lot.
- Bleeding Brakes: This is the process of removing air bubbles from the brake lines. You do this after replacing a brake line or caliper, or if you accidentally let the master cylinder run dry.
- Flushing Brakes: This is the process of completely replacing all the old fluid in the entire system with new fluid.
This guide covers a full brake fluid flush, which inherently involves bleeding each brake line until fresh fluid comes out.
Comparing Brake Bleeding Methods – Which Is Right for You?
There’s more than one way to get the old fluid out and the new fluid in.
Method 1 – The Two-Person Pump & Hold (Most Common)
This is the classic, time-tested method this guide will focus on.
- Pros: Requires no special tools other than a wrench and tube. It’s very effective.
- Cons: You need a coordinated and patient helper.
Method 2 – Vacuum Bleeding (Great for Solo DIYers)
This method uses a hand-operated vacuum pump to suck the fluid and air out through the bleeder screw.
- Pros: Can easily be done by one person.
- Cons: Requires a vacuum bleeder kit. It can sometimes pull a little air in around the bleeder screw threads, making it look like there are still bubbles in the line.
Method 3 – Pressure Bleeding (Fastest & Most Professional)
This involves a special tool that attaches to the master cylinder and pressurizes the system, forcing fluid out when you open the bleeder screws.
- Pros: The fastest and most efficient method, can be done by one person, and there’s no risk of running the master cylinder dry.
- Cons: Requires a pressure bleeder, which is the most expensive tool of the three.
How to Replace Brake Fluid – The Definitive DIY Guide
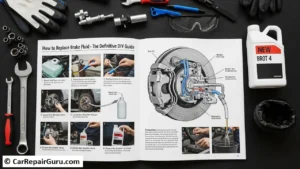
It’s time to get our hands dirty. We will be using the two-person “pump and hold” method. Read through all the steps before you begin.
The Step-by-Step Brake Fluid Flush Process
Step 1: Prepare the Vehicle
Park on level ground, chock the wheels, and engage the parking brake. Loosen the lug nuts on all four wheels slightly before lifting the car. Using your jack, lift the car and secure it firmly on jack stands. Remove all four wheels to get easy access to the brake calipers.
Step 2: Access & Clean the Master Cylinder
Pop the hood and locate the master cylinder. It’s a small plastic reservoir, usually near the back of the engine bay on the driver’s side. Using a clean rag, thoroughly wipe down the cap and the entire area around it. You absolutely do not want any dirt or debris falling into the reservoir.
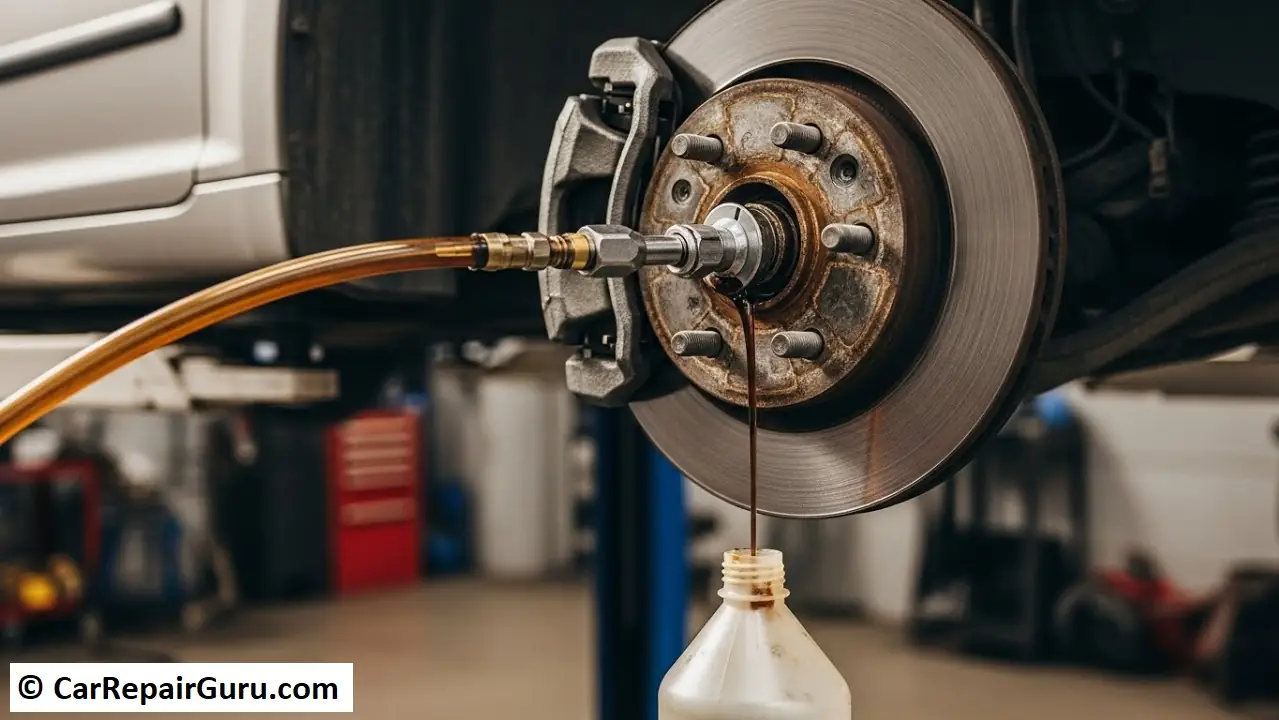
Step 3: Remove Old Fluid from the Reservoir
Open the master cylinder cap. Using your turkey baster or syringe, suck out as much of the old, dark brake fluid as you can. Squirt the old fluid into your catch bottle. Do not empty the reservoir completely! Leave about half an inch of fluid at the bottom to prevent air from getting into the system.
Step 4: Refill with New Fluid
Open your new, sealed bottle of brake fluid. Carefully pour the fresh, clear fluid into the master cylinder reservoir until it reaches the “MAX” line. Place the cap loosely back on top to prevent contamination, but don’t seal it shut yet.
Step 5: Bleed the Brakes (The Main Event)
This is where the magic happens. You need to bleed the brakes in a specific order: start with the wheel farthest from the master cylinder and work your way to the one closest. For most cars (with the master cylinder on the driver’s side), the order is:
- Right Rear (Passenger Rear)
- Left Rear (Driver Rear)
- Right Front (Passenger Front)
- Left Front (Driver Front)
Now, for the two-person procedure at the first wheel (Right Rear):
- Find the small nipple on the back of the brake caliper—this is the bleeder screw.
- Place your box-end wrench over the bleeder screw, then firmly press your clear plastic tubing over the end of the nipple. Put the other end of the tube into your catch bottle, making sure the end of the tube is submerged in some of the old fluid you collected earlier (this prevents air from being sucked back in).
- Person 1 (Helper in the car): With the car off, pump the brake pedal 3-4 times, then hold it down firmly. Announce “Holding!”
- Person 2 (You at the wheel): Once your helper says “Holding,” use the wrench to turn the bleeder screw about a quarter to a half turn. Old fluid and bubbles will shoot into the tube. The pedal will sink for your helper.
- Person 2: After 1-2 seconds, close the bleeder screw snugly before your helper releases the pedal. Announce “Closed!”
- Person 1: Only after hearing “Closed,” slowly release the brake pedal.
Repeat this “Pump… Hold… Open… Close… Release” cycle until you see clean, clear fluid with no air bubbles flowing through the tube. This might take 5-10 repetitions per wheel.
Pro Tip: Don’t Let the Master Cylinder Run Dry!
This is the most important rule of a brake fluid change. After bleeding each wheel, go back and check the fluid level in the master cylinder. Top it off to the “MAX” line with new fluid. If the reservoir runs dry, you will suck a massive amount of air into the system and the ABS module, turning an easy job into a very difficult one.
Step 6: Final Top-Off and Checks
Once you have bled all four wheels in the correct order, go back to the master cylinder one last time. Top it off to the “MAX” line and screw the cap on tightly. Go around to each bleeder screw and make sure they are snug (don’t over-tighten them). Wipe away any spilled fluid.
Step 7: Test the Brakes
Put the wheels back on and hand-tighten the lug nuts. Lower the car off the jack stands. Torque the lug nuts to your vehicle’s specification.
Before you start the engine, sit in the driver’s seat and pump the brake pedal. It should feel firm and solid. Start the car and test the brakes slowly in your driveway or a safe, low-traffic area before heading out on the road.
Troubleshooting Common Problems After a Brake Fluid Change
Things don’t always go perfectly. Here’s how to fix the most common issues.
Problem – The Brake Pedal is Spongy or Goes to the Floor
- Cause: There is still air trapped somewhere in the brake lines.
- Solution: You need to re-bleed the entire system. Be methodical. Ensure your helper is holding the pedal down firmly and that you are closing the bleeder screw before they release the pedal.
Problem – I Have a Leak Around the Bleeder Screw
- Cause: The screw is either not tight enough, or the threads have been stripped from over-tightening.
- Solution: Try tightening the screw until it is snug. If it still leaks, the threads may be damaged. You may need to replace the bleeder screw or, in a worse case, the entire brake caliper.
Problem – The ABS or Brake Warning Light is Now On
- Cause: This could be from the fluid level being too low, or if you let the master cylinder run dry, air may be trapped in the complex ABS module.
- Solution: First, double-check the fluid level and top it off. If the light remains on and the pedal feels fine, the issue may resolve after a short drive. If air is trapped in the ABS module, you may need a special automotive scan tool to perform an “ABS bleed” or “automated bleed” procedure, which may require a trip to a mechanic.
Professional Brake Fluid Flush Cost vs. DIY

One of the biggest benefits of doing this yourself is the savings.
- DIY Cost: You can expect to spend $35 to $70. This includes 1-2 quarts of quality brake fluid ($15-$30) and basic tools like tubing and a catch bottle if you don’t already have them.
- Professional Service Cost: A brake fluid flush cost at a repair shop or dealership typically ranges from $100 to $200, depending on the vehicle and local labor rates.
Final Thoughts – Better Safety, Better Performance
Congratulations! By learning how to perform a brake fluid flush, you’ve mastered a crucial piece of vehicle maintenance. You’ve not only saved money but have also directly improved the safety and performance of your vehicle. A firm brake pedal provides confidence, and knowing your brake system is free of moisture and corrosion provides peace of mind.
Have questions or a tip to share? Drop a comment below! Now that your brakes are in top shape, why not check out our guide on When to Replace Your Brake Pads for your next weekend project?
FAQ – Common Brake Fluid Questions
What color should brake fluid be?
New brake fluid should be almost clear with a light yellow or amber tint. As it ages and absorbs moisture and contaminants, it will turn dark brown or black.
Can I mix DOT 3 and DOT 4 brake fluid?
Yes, you can mix DOT 4 with DOT 3. However, the mixture will have the lower boiling point performance of DOT 3. You should not mix DOT 3 into a system that requires DOT 4.
What happens if you don’t change your brake fluid?
The fluid will become saturated with water, lowering its boiling point and risking brake failure under heavy use. It will also cause corrosion inside your brake lines and components, leading to expensive repairs.
How do you dispose of old brake fluid?
Do not pour it down the drain or on the ground. It is hazardous waste. Pour the old fluid into the empty new brake fluid bottles, label them “Used Brake Fluid,” and take them to your local auto parts store or municipal hazardous waste disposal facility.
Can I just top off my brake fluid instead of flushing it?
You should only top off your fluid if the level is slightly low and the fluid is still clean. If the fluid level is dropping, you likely have a leak that needs to be repaired. Topping off old, dark fluid does not remove the water and contaminants already in the system.